DMX/Art-Net Input
With DMX input, a lighting console can control the FXCanvas color palettes. The console sends Art-Net or sACN (E1.31) data. This gives a console-first workflow. A lighting designer drives the FXCanvas visuals from a familiar tool, for example grandMA3, Eos, ChamSys, or any other console with Art-Net or sACN support.
Why Use Art-Net Input?
Art-Net input brings FXCanvas into your existing lighting workflow:
- Console Integration — Control the FXCanvas colors from cues, from macros, or by hand on your lighting console
- Unified Control — Manage the traditional lighting fixtures and the FXCanvas visuals from one interface
- Show Integration — Program the FXCanvas colors together with your lighting looks, so the whole show stays in step
- Designer Familiarity — Use the console that you know, and learn no new interface
When Art-Net input is enabled, FXCanvas becomes a "virtual fixture". Your console patches and controls it like any other lighting instrument.
Quick Start
These four steps put Art-Net input to work.
1. Open DMX Settings
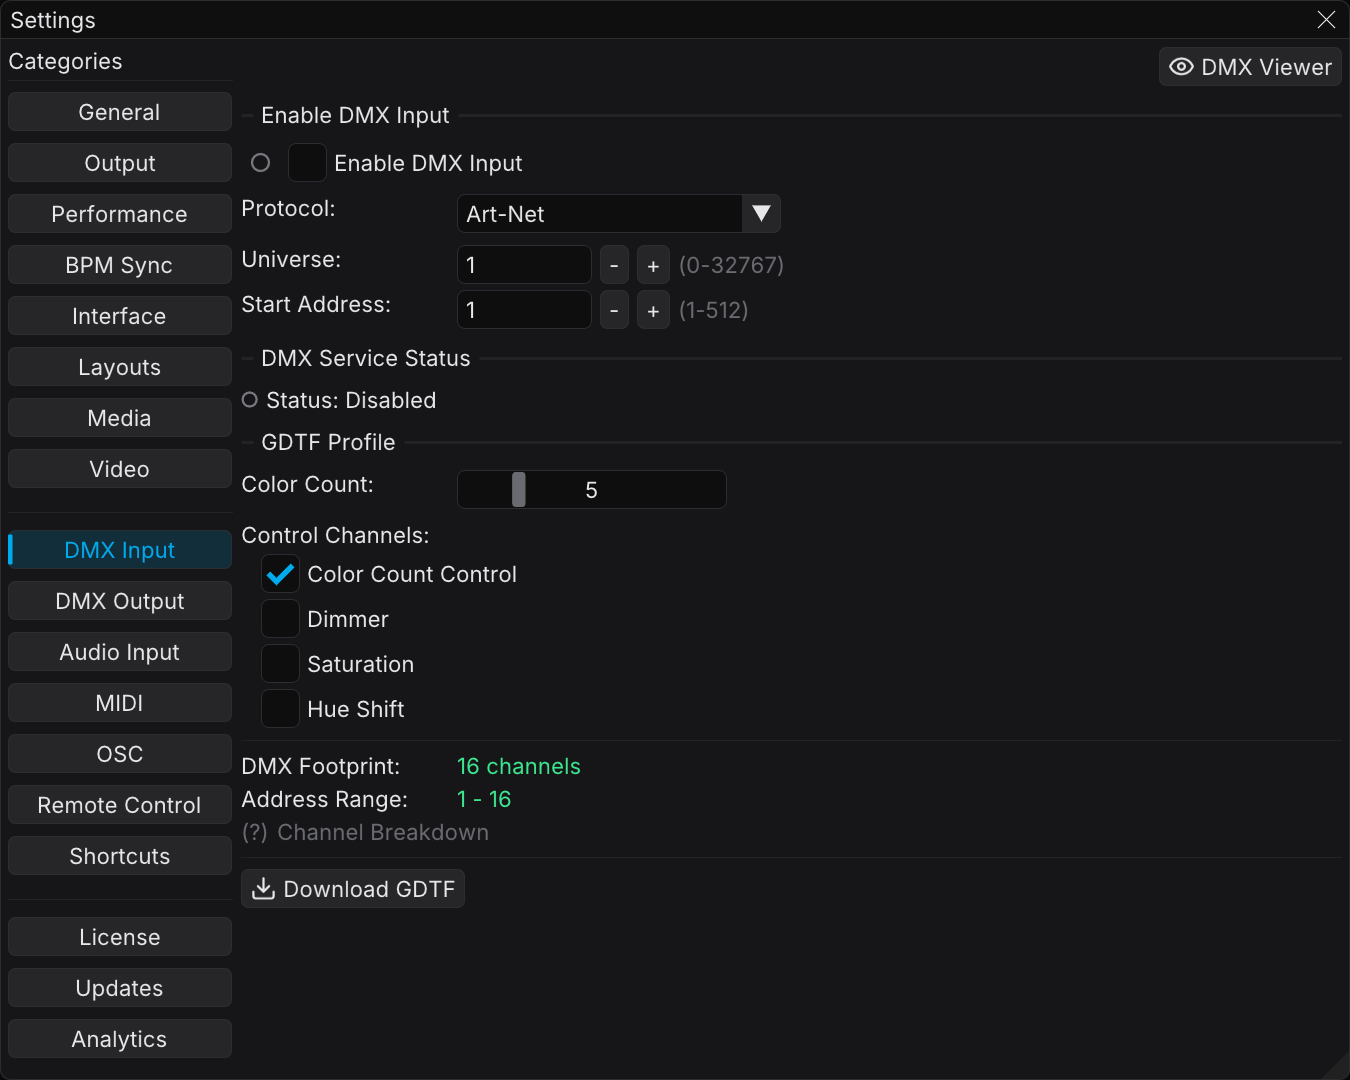
Open Edit → Settings. Select the DMX Input category. Output has its own DMX Output category.
2. Configure Connection
Enable DMX Input. Then set the network values:
| Setting | Description |
|---|---|
| Enable DMX Input | Master toggle that starts the DMX reception |
| Protocol | Art-Net or sACN (E1.31) |
| Universe | The universe that your console sends to (Art-Net default: 0, sACN default: 1) |
| Start Address | The first DMX channel for FXCanvas (default: 1) |
The Art-Net settings (Network Adapter, Net, Subnet) appear only when DMX Input is enabled.
3. Download GDTF Profile
In the GDTF Profile section:
- Set the Color Count with the slider (1-20 colors)
- If you want that channel, enable Color Count Control under Control Channels
- Read the DMX Footprint display, which shows your channel layout
- Click Download GDTF to save the fixture file
4. Patch in Your Console
- Import the GDTF file into your lighting console
- Patch "FXCanvas Palette" at the universe and the address that you set
- Set the Color Mode in FXCanvas to Art-Net (Live panel → Color section gear menu → Art-Net)
You can now control the FXCanvas colors from your lighting console.
Console Patching Guide
After you download the GDTF profile, import it into your lighting console.
grandMA3
- Open Setup → Patch → Fixture Types
- Click Import and select the
.gdtffile - Go to Patch and add the fixture
- Set the Universe and the Address to match the FXCanvas settings
- Enable Art-Net output to the IP address of FXCanvas, on the universe that you set
ETC Eos Family
- Open Browser → Import Fixture
- Select the
.gdtffile - In Patch, add the fixture at the address that you want
- Set Network → Output Protocols → sACN/Art-Net to send to FXCanvas
ChamSys MagicQ
- Open Setup → View GDTF
- Click Import GDTF and select the file
- In Patch, select the FXCanvas fixture from your library
- Assign the fixture to the universe and the address
- Set the Art-Net output nodes in Setup → Network
These instructions are general guidance. The documentation of your console gives the detailed steps.
General Tips
- Make sure that your console and FXCanvas are on the same network
- The console must send Art-Net or sACN (E1.31)
- Make sure that the universe number is identical on the console and in FXCanvas
- FXCanvas listens on the standard Art-Net port (6454) or the sACN port (5568)
Configuration Options
The DMX Input page has these sections. The Art-Net Settings section appears only while DMX input is enabled and the protocol is Art-Net.
| Section | Description |
|---|---|
| Enable DMX Input | Master toggle and the basic settings (Protocol, Universe, Start Address) |
| DMX Service Status | The connection state and a preview of the received colors |
| Art-Net Settings | The network adapter and the advanced addressing (appears when DMX input is enabled) |
| GDTF Profile | The fixture profile settings and the export |
Protocol
FXCanvas supports Art-Net and sACN (E1.31). Select the protocol that your lighting console sends.
- Art-Net listens on UDP port 6454 and uses Net/Subnet/Universe addressing.
- sACN (E1.31) listens on UDP port 5568 and joins the multicast group of the universe (239.255.x.x). The Net and Subnet settings do not apply.
Universe
This is the universe that FXCanvas listens on. It must match the universe that your lighting console sends to.
| Property | Art-Net | sACN |
|---|---|---|
| Range | 0-32767 | 1-63999 |
| Default | 0 | 1 |
Start Address
This is the first DMX channel in the universe for the FXCanvas data.
| Property | Value |
|---|---|
| Range | 1-512 |
| Default | 1 |
If you share a universe with other fixtures, set this value to a free address range.
Network Adapter
Select the network interface for the Art-Net data.
| Option | Description |
|---|---|
| All Interfaces | Listens on every network adapter (default) |
| Specific adapter | Shows the IP address and the adapter name |
If your computer has several network connections, select one adapter. FXCanvas then receives Art-Net on that adapter only.
Net and Subnet
Advanced addressing for large Art-Net systems.
| Setting | Range | Default |
|---|---|---|
| Net | 0-127 | 0 |
| Subnet | 0-15 | 0 |
Most systems use Net 0 and Subnet 0. Change these values only when your console uses extended Art-Net addressing.
GDTF Profile Configuration
The GDTF Profile section sets how your lighting console sees FXCanvas as a fixture.
Color Count
Use the slider to set how many palette colors the fixture profile holds.
| Property | Value |
|---|---|
| Range | 1-20 colors |
| Default | 5 colors |
Choosing a Color Count:
| Colors | Channels* | Best For |
|---|---|---|
| 1-3 | 4-10 | Simple single-color or gradient effects |
| 5 | 16 | Default, a good balance for most shows |
| 10 | 31 | Extended palettes with more color variety |
| 20 | 61 | Maximum flexibility and complex color schemes |
*With Color Count Control enabled. Subtract 1 when it is disabled.
Control Channels
This subsection holds optional channels that extend the fixture.
Color Count Control
When this setting is enabled, FXCanvas adds a channel at the start of the fixture. That channel controls how many colors are active.
| Setting | Behavior |
|---|---|
| Enabled (default) | Channel 1 controls the active color count |
| Disabled | All defined colors are always active |
Control Channel Values:
| Value | Behavior |
|---|---|
| 0 | FXCanvas activates every configured color |
| 1 to your Color Count | Use exactly this many colors (black counts as a color) |
| Above your Color Count | FXCanvas uses your Color Count value |
- You want to change the number of active palette colors during the show
- Different cues use a different number of colors
- You want fewer active colors than your Color Count
- You always use a fixed number of colors
- You want the smallest number of DMX channels
- You want simpler console programming
Global Control Channels (Dimmer, Saturation, Hue Shift)
With these optional channels, your console drives the global look of FXCanvas in real time. When a channel is enabled and DMX data arrives, that channel overrides the matching control on every frame.
| Channel | DMX Value → Control | Neutral |
|---|---|---|
| Dimmer | 0 = black … 255 = full brightness (0.0–1.0 master dimmer) | 255 |
| Saturation | 0 = grayscale, 128 ≈ normal (1.0), 255 = 2× (2.0) | 128 |
| Hue Shift | 0 = −1.0 … 128 ≈ no shift … 255 = +1.0 | 128 |
These channels drive the same global controls as OSC and REST (/global/dimmer, /global/saturation, /global/hue). FXCanvas puts them after the color channels in the fixture (see Channel Layout Reference). After you enable them, download the GDTF profile again, so your console gets the matching channels.
While DMX drives these channels, it overrides the manual and OSC adjustments on every frame. When the DMX input stops, FXCanvas holds the last received values.
DMX Footprint Display
The interface shows the channel layout:
- DMX Footprint — The total channel count, for example "16 channels"
- Address Range — The start address and the end address for your settings
- Channel Breakdown — Hover over "(?) Channel Breakdown" to see the detailed layout
FXCanvas calculates the footprint like this:
Total Channels = (Color Count × 3)
               + (Color Count Control ? 1 : 0)
               + (Dimmer ? 1 : 0) + (Saturation ? 1 : 0) + (Hue Shift ? 1 : 0)
Downloading the Profile
Click Download GDTF to save a .gdtf file. The suggested filename holds your settings:
FXCanvas_Palette_5c.gdtf— 5 colors with the control channelFXCanvas_Palette_10c_noctl.gdtf— 10 colors without the control channel
Channel Layout Reference
With Color Count Control Enabled
The first channel controls the active color count. The RGB triplets come after it.
| Channel | Function | Range |
|---|---|---|
| 1 | Color Count Control | 0 = all colors, 1 to Color Count = fixed count |
| 2 | Color 1 Red | 0-255 |
| 3 | Color 1 Green | 0-255 |
| 4 | Color 1 Blue | 0-255 |
| 5 | Color 2 Red | 0-255 |
| ... | ... | ... |
Example (5 colors): 16 total channels
- Ch 1: Control
- Ch 2-4: Color 1 RGB
- Ch 5-7: Color 2 RGB
- Ch 8-10: Color 3 RGB
- Ch 11-13: Color 4 RGB
- Ch 14-16: Color 5 RGB
Without Color Count Control
The RGB data starts at channel 1:
| Channel | Function | Range |
|---|---|---|
| 1 | Color 1 Red | 0-255 |
| 2 | Color 1 Green | 0-255 |
| 3 | Color 1 Blue | 0-255 |
| 4 | Color 2 Red | 0-255 |
| ... | ... | ... |
Example (5 colors): 15 total channels
Global Control Channels Placement
If you enable Dimmer, Saturation, or Hue Shift, FXCanvas adds them after all color channels, in that order. The table below shows a 1-color profile without count control and with all three channels enabled.
| Channel | Function |
|---|---|
| 1-3 | Color 1 RGB |
| 4 | Dimmer |
| 5 | Saturation |
| 6 | Hue Shift |
Control Channel at Zero
When the control channel is 0, FXCanvas activates every configured color slot. A black slot stays in the palette and counts as a color.
Earlier builds scanned for the last slot that was not black. That behavior is gone: a color that passed through black changed the palette size mid-fade and made the output flash. To use fewer colors than your Color Count, set the control channel to a fixed count.
Status Monitoring
The DMX Service Status section shows the state of the Art-Net reception in real time. While the status is Receiving, the section also shows a swatch for each active color.
Status Indicator
A colored dot with text shows the current state:
| Status | Color | Meaning |
|---|---|---|
| Receiving | Green | FXCanvas receives Art-Net packets |
| Listening (No Data) | Yellow | DMX input is enabled, but no data arrived yet |
| Not Running | Red | The protocol failed to start |
| Disabled | Gray | DMX input is disabled |
Color Preview Swatches
During reception, FXCanvas shows the colors as small swatches:
- FXCanvas shows up to 10 colors, with a "+N" mark for more
- Active colors have white borders
- Inactive colors have gray borders
- Hover over a swatch to see the RGB values
Using Art-Net Colors
Color Section Integration
The Color section of the Live panel gives direct control of the Art-Net color mode.
Art-Net Mode
- Available in the gear menu of the Color section, after you configure DMX input in Settings
- Select it to change from Palette mode to Art-Net mode
- Auto-enables DMX — When DMX input is disabled, Art-Net mode enables it
Status Indicator In Art-Net mode, a status indicator shows the connection state:
- Receiving — FXCanvas receives Art-Net packets from your console
- Waiting... — DMX input is enabled, but no data arrived yet
- Disabled — DMX input is disabled
Color Swatches Preview
- FXCanvas shows the received DMX colors as small preview swatches
- The swatches update in real time as your console sends new values
Returning to Palette Mode
- Click any palette in the Palette Panel to return to Palette mode
- Or select Palette in the gear menu of the Color section
Troubleshooting
No Data Received
Firewall:
- Windows Firewall can block Art-Net (UDP port 6454)
- Add an exception for FXCanvas, or open UDP port 6454
Network:
- The console and FXCanvas must be on the same network and subnet
- Make sure that the console sends Art-Net
- Select your specific network adapter instead of "All Interfaces"
Universe:
- The console universe and the FXCanvas universe must be identical
- FXCanvas counts universes from 0 (Universe 0 is the first universe)
Wrong Colors or Channel Offset
Start address:
- Make sure that the console patch address matches the FXCanvas start address
- Make sure that no channels overlap with other fixtures
GDTF profile:
- The GDTF profile in your console must match the FXCanvas settings
- If you change the color count or the control channel, download the GDTF file again and import it again
Status Shows "Not Running"
- Make sure that Enable DMX Input is checked
- Disable DMX input, then enable it again
- Read the Log Viewer (Tools → Log Viewer) for error messages
Colors Do Not Match the Console Programmer
Color count mismatch:
- With the control channel, make sure that its value is correct (0 for auto, or a fixed count)
- Without the control channel, all configured colors are always active
More colors active than you expect:
- A control channel of 0 activates every configured slot, black slots included
- Use a fixed count on the control channel
Multi-NIC Systems
If your computer has several network adapters:
- Select the specific Network Adapter that receives Art-Net
- "All Interfaces" can fail when Art-Net arrives on an unexpected interface
Tips and Best Practices
- Use fixture groups — Group the FXCanvas colors for fast selection
- Create color presets — Save common color combinations as console presets
- Macro integration — Trigger color changes from console macros for complex cues
- Test thoroughly — Make sure that the Art-Net connection works before the show
- Have a backup — Keep some palettes saved. If Art-Net fails, use them.
- Monitor status — Keep the Settings window available, so you can watch the connection status
- Dedicated network — For critical shows, use a dedicated lighting network
- Static IPs — Use static IP addresses to avoid DHCP errors
- Network switch — Use a good gigabit switch for reliable Art-Net delivery
- Right-size your fixture — Use only the number of colors that you need
- Share universes carefully — FXCanvas can share a universe with other fixtures when the addresses do not overlap
- Plan your patch — When you select the start addresses, leave room for later expansion
DMX Monitor
The DMX Monitor shows the incoming DMX data in real time. Use it to debug your Art-Net setup. The monitor is the Monitor tab of the DMX Manager window, in Input mode.
Opening the DMX Monitor
Open Tools → DMX Manager. Select the Monitor tab. Change to Input mode with the toggle at the top.
Understanding the Views
The Monitor tab has three views. Each view shows the same data in a different way.
Table
This view shows the detail in a scrollable table.
| Column | Description |
|---|---|
| Ch | The channel number (1-512) |
| Value | The raw DMX value (0-255), over a fill that grows with the value |
| % | The value as a percentage (0-100%) |
| Type | Red, Green, Blue, or Control for the configured channels |
- Show All 512 Channels checkbox shows every channel
- FXCanvas highlights the rows of the configured range
Best for: precise troubleshooting and exact values.
Grid
This view shows all 512 channels in a compact 32×16 grid.
- Brighter cells hold higher values
- A blue border marks your configured address range
- Hover over a cell to see the channel number and the value
Best for: an overview of the whole universe.
Colors
This view shows the colors that FXCanvas reads from your configured DMX range.
- The color swatches match what the FXCanvas effects receive
- Each color shows its index and its RGB values
- FXCanvas separates the active colors from the inactive ones
- The view updates in real time as the DMX values change
Best for: proof that your console sends the correct palette colors.
Status Header
The top of the monitor shows the connection information:
| Display | Description |
|---|---|
| Status dot | Green (Receiving), Yellow (Waiting...), Red (Not Running), Gray (Disabled) |
| Protocol & Universe | The protocol and the universe, for example "Art-Net Universe 0" |
| Address Range | Your configured start channel through the end channel |
| Timing | The time since the last packet (ms or seconds) |
Troubleshooting with DMX Monitor
Not Receiving Data
If the status shows "Waiting..." or no data, do these steps:
- Make sure that DMX input is enabled — Open Edit → Settings → DMX Input
- Make sure that the universe number matches — It must be the universe of your console
- Make sure that the network works — The console and FXCanvas must be on the same network
- Make sure that the firewall passes UDP port 6454 — Windows Firewall can block that port
Wrong Channel Values
If the values are not the values that you expect, do these steps:
- Use the Grid view to see which channels carry activity
- Make sure that the start address matches — Your console patch must match FXCanvas
- Make sure that the GDTF profile matches — Download it again after a settings change
Colors Not Matching Console
If the Colors view shows colors that differ from the console programmer, do these steps:
- Make sure that the control channel is correct — When it is enabled, channel 1 sets the active color count
- Make sure that the color count matches — The GDTF profile must match your console setup
- Look for a channel offset — Use the Table view to see where the color data starts
Related Topics
- Palettes — The FXCanvas color palettes and the Color section
- Sources — Visual patterns that use palette colors
- DMX Output & Mapping — Send the visuals the other direction, out to real lighting fixtures
- Getting Started — The basics of FXCanvas