Shows and Cues
Shows and cues are the organizational base of FXCanvas. With them you manage your work and recall a complete visual state during a live performance. A show holds your project settings and all of its cues. A cue holds a snapshot of your visual state, and you can trigger it at once.
What are Shows?
A show in FXCanvas is a project container. It holds all settings and content for one production, event, or performance. It is similar to a project file in other creative software.
Each show holds its own:
- Render resolution: the master canvas size for your visuals
- Associated DMX rig: the rig that loads with the show
- Output preset: the saved output settings that the show uses
- BPM and composition settings: tempo, hue shift, saturation, mirror and symmetry
- Cues: all saved visual states of the show
- Live look: the source, effects, palette and composition that were on screen when you left
Shows keep your work organized, and a change from one project or event to another is fast. You can keep separate shows for different venues, clients, or performance types.
A show holds no presets. Each cue carries a full snapshot of the values, so a show plays without your preset library. Export Show packages the referenced presets when you move a show to another machine.
What are Cues?
A cue is a complete snapshot of your current visual state. When you trigger a cue, FXCanvas recalls these items at once:
- Source: the active source type and all of its parameter values
- Palette: the colors that were active, and not only a reference to a palette
- Effects chain: all effects in order, with their parameter values
- Composition settings: hue shift, saturation, mirror and symmetry
- Live settings: master dimmer, global speed and direction, and color mode
- Tempo: the BPM at the capture of the cue
- DMX map: the map that becomes active when the cue fires
A cue recalls only what its recall scope allows. A "palette only" cue changes the colors and leaves the source in operation.
Cues exist for live performance. You prepare the cues before the show and trigger them during the show, instead of many parameter adjustments by hand. The transition between two completely different looks is immediate and reliable.
Understanding Show Files
What Gets Saved in a Show
FXCanvas stores two items for each show:
show.json: the name and the timestamps of the show, plus a session block. The session block holds the requested render resolution, the name of the associated rig, and the output preset reference. It also holds the BPM, the composition settings, the last cue that you fired, and a snapshot of the live look.Cues/: one file for each cue, with aThumbnails/subfolder for the generated tile images
FXCanvas stores the requested render resolution apart from the resolution that renders now. On a Free-tier machine, a 4K show clamps the live canvas to 720p, and the file keeps the 4K value. The show is then intact after you license the machine.
FXCanvas reports every reference that the session cannot resolve, for example a rig that is not installed, or a palette that you deleted. FXCanvas keeps that reference in the file and never erases it silently.
Show File Location
FXCanvas stores the shows in your Documents folder:
- Windows —
Documents\FXCanvas\Shows\{ShowName}\ - macOS —
~/Documents/FXCanvas/Shows/{ShowName}/
Each show has its own folder with show.json and its subfolders.
A show folder has this structure:
{ShowName}/
  - show.json (main show configuration)
  - Cues/ (cue files and their thumbnails)
Cues are full snapshots, so the show folder holds no preset copies of its own.
Creating and Managing Shows
Creating a New Show
To create a new show:
- Open File → New Show... from the menu bar
- Enter a name for your show
- Set the render resolution with a preset (720p, 1080p, 4K) or with custom values
- Click Create
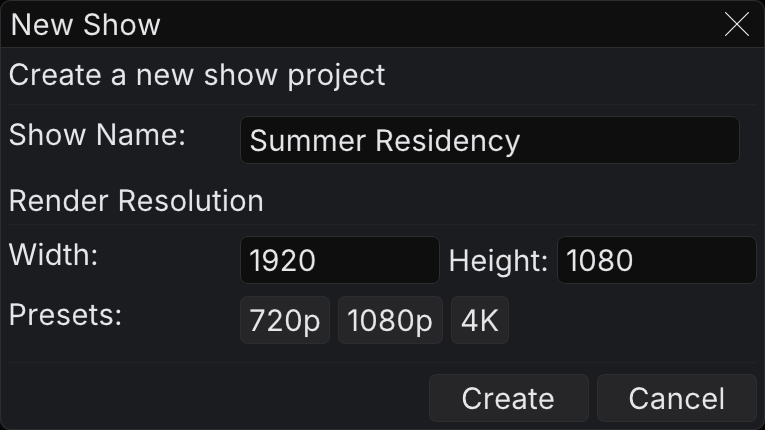
The New Show dialog holds these fields:
| Field | Description |
|---|---|
| Show Name | A descriptive name for your project (required) |
| Render Resolution | The width and the height of the master canvas |
| Preset buttons | Quick selection of 720p (1280×720), 1080p (1920×1080), or 4K (3840×2160) |
A show name cannot hold the special characters \/:*?"<>|. Each show name must be unique among your existing shows.
Without a license the render canvas stops at 720p. FXCanvas clamps the 1080p and 4K presets when you create the show. See What requires a license.
Opening Existing Shows
To open a show that exists:
- Open File → Open Show... from the menu bar
- Select a show in the list
- Click Open, or double-click the show name
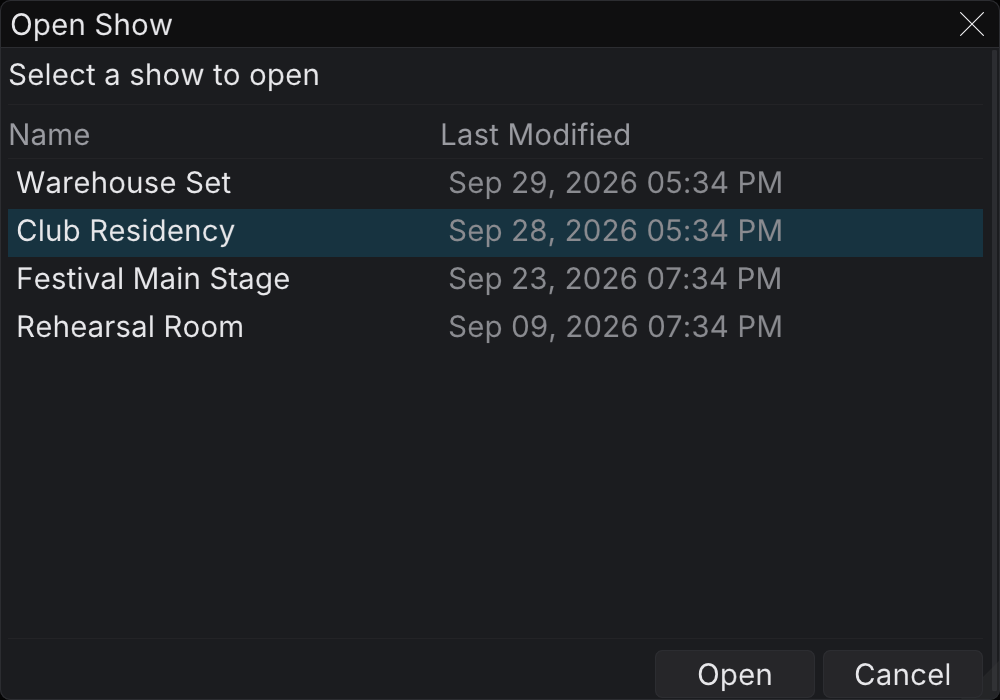
The Open Show dialog shows these columns:
| Column | Description |
|---|---|
| Name | The name that you gave the show when you created it |
| Last Modified | The time of the last save |
The list sorts the shows by the last change, with the newest show at the top.
Saving Shows
There is no Save Show command, because shows save themselves. FXCanvas
watches the show state and writes it to disk about two seconds after your last
edit. FXCanvas writes it again when you close the show or quit. The writes are
atomic and keep one generation of backup, so an interrupted save cannot leave
half a show.json.
Ctrl+S is still available as an immediate write, for example before you remove a drive. You never have to press it.
Autosave covers the show, and the show includes the live look. Autosave does not write your live changes into a cue: Update Cue stays the explicit commit. Autosave guarantees only that your uncommitted changes survive a crash or a restart.
Reopening a Show
A show opens in the state that you left. FXCanvas restores the items in this order: render resolution, DMX rig, output preset, palette, composition, BPM, and then the live look. The source that ran returns with its parameters. FXCanvas rebuilds the effects chain, and the palette returns with its colors.
Closing Shows
To close the current show, use File → Close Show. FXCanvas writes any pending autosave first, for the show and for its rig.
Recent Shows
FXCanvas tracks the shows that you opened recently. They are in File → Recent Shows. Select a show name to open it again, or use Clear Recent to empty the list.
Moving a Show to Another Machine
A show folder alone is not portable. Cues are complete snapshots, so they play on any machine. The preset ids, the media ids, and the DMX map names in them have a meaning only on the machine that wrote them. Export Show packages the show together with everything that its cues reference.
Exporting a Show
- Open File → Export Show...
- Read the summary of the content
- Select whether to include the media files and the DMX rig, and whether to produce a single file
- Select a destination folder
- Click Export
The summary updates with each option that you change, so it always matches the result.
| Option | Description |
|---|---|
| Include media files | Copies the video and image files that your cues play. These files can be large, so the size stands next to the checkbox. |
| Include DMX rig | Copies the rig folder of the show, which holds the DMX maps that your cues reference. |
| Export as a single .fxshow file | Produces one .fxshow archive instead of a folder. It is easier to send, and the content is identical. |
FXCanvas lists every reference that it cannot find under Not included, in amber, before the export. A missing preset does not stop the export and does not change the playback, because the cue carries its own snapshot. You lose only the ability to edit that reference on the other machine.
FXCanvas never copies the built-in presets. They ship with FXCanvas, so the machine that you send the show to has them already.
Importing a Show
- Open File → Import Show...
- Select an exported folder or a
.fxshowfile - Read the list of the content
- Click Import
An import never overwrites your own content:
| Situation | What happens |
|---|---|
| A show of that name already exists | FXCanvas installs the imported show as "Name (2)" |
| A packaged preset is already in your library | FXCanvas keeps your copy and skips the packaged one |
| A rig of that name already exists | FXCanvas keeps your rig and does not install the packaged rig |
FXCanvas copies the imported media into your media folder, and it relinks the cues that use the media.
Open the imported show from File → Open Show.
Working with Cues
The Cues Panel
In the Cues panel you read and manage all cues of the current show. The panel has two views. You can switch between List View and Thumbnail View for your workflow.
The Cues panel is in your workspace. If it is not visible, open it from the View → Panels menu.
With no show loaded, the panel shows a message that asks you to open a show. Cues exist only inside a show, and there are no global cues.
Action Bar
The action bar at the top of the Cues panel holds the main controls:
| Control | Icon | Description |
|---|---|---|
| Save Cue | plus | Save the current visual state as a new cue |
| Previous | chevron-left | Load the previous cue in the sequence |
| Next | chevron-right | Load the next cue in the sequence |
| Current cue chip | none | The cue that is loaded. Read Current Cue Status |
| Thumbnail View | grip | Change to Thumbnail View (a visual grid) |
| List View | list | Change to List View (a table) |
| Tile zoom | sliders | Set the tile width, from 72 to 180 pixels. Thumbnail View only: the slider is not shown in List View |
The Previous and Next buttons move through the cues in cue-number order, so you can step through a setlist during a performance. They do not wrap. On the last cue, Next is disabled and does not return to the first cue. The OSC, MIDI, and REST cue steps use the same order and the same no-wrap rule. A remote surface and the panel buttons always agree about your position in the list.
Cue Properties
Each cue has the following properties:
| Property | Description |
|---|---|
| Cue Number | A decimal number for the order, for example 1.0, 1.5, or 2.0. Use decimals to insert a cue between two existing cues without a renumber. |
| Name | A descriptive name for the cue |
| Description | An optional field for notes and context |
| Source | The source type and all parameter values |
| Palette | The colors themselves, plus the name of the palette that they came from |
| Effects chain | Every effect in the chain, with all parameters |
| Composition | Hue shift, saturation, mirror and symmetry |
| Live settings | Master dimmer, global speed and direction overrides, color mode |
| BPM | The tempo at the capture time |
| DMX Map | The map that becomes active when the cue fires, bound by name |
| Recall scope | Which of the items above a recall can touch |
The snapshot keeps a cue stable. A later change, rename, or delete of the original preset or palette does not affect the cue.
A recall loads the full state immediately. There is no crossfade between two cues. Cue files still carry a transition time for a future fade engine. No code reads that value, and the Cue Editor does not show it as a field.
View Modes
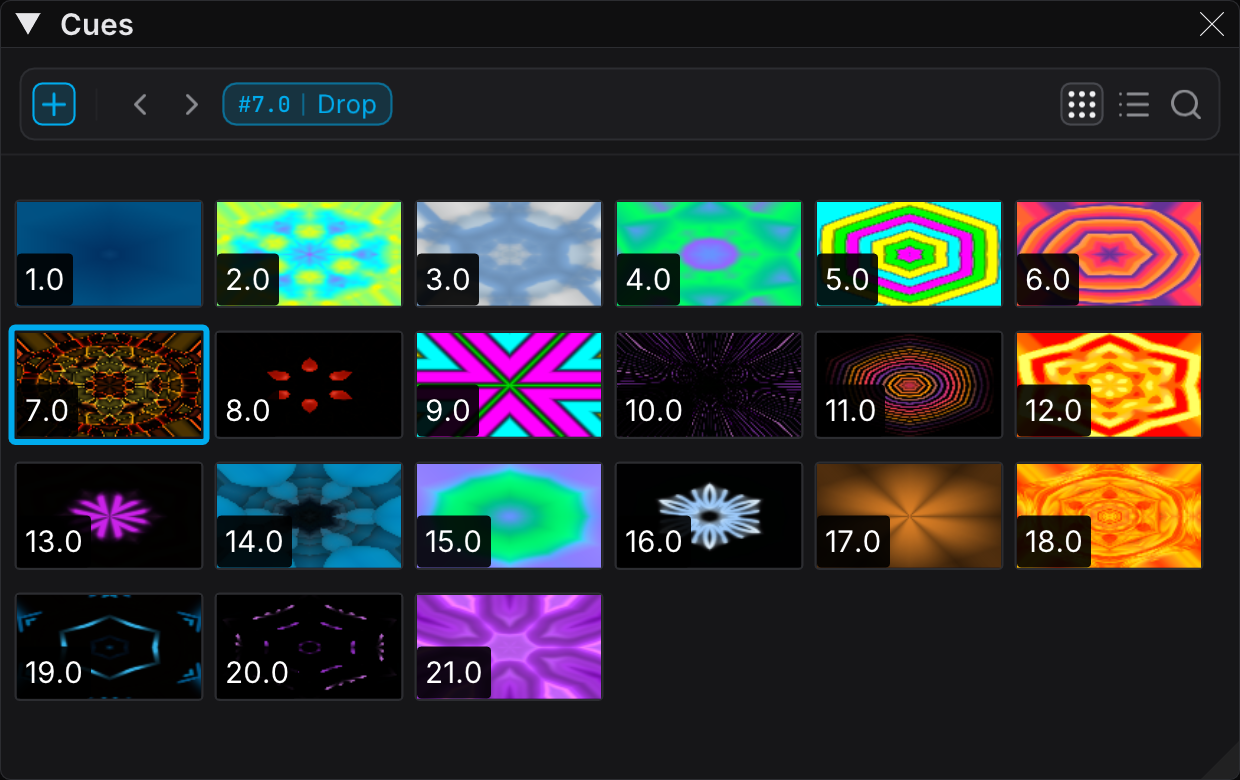
Thumbnail View is the default. A cue is a look, and the grid is what you recognize at showtime.
List View
List View shows the cues in a table with columns that you select. This view is best for a large number of cues, and for fast edits of the cue details.
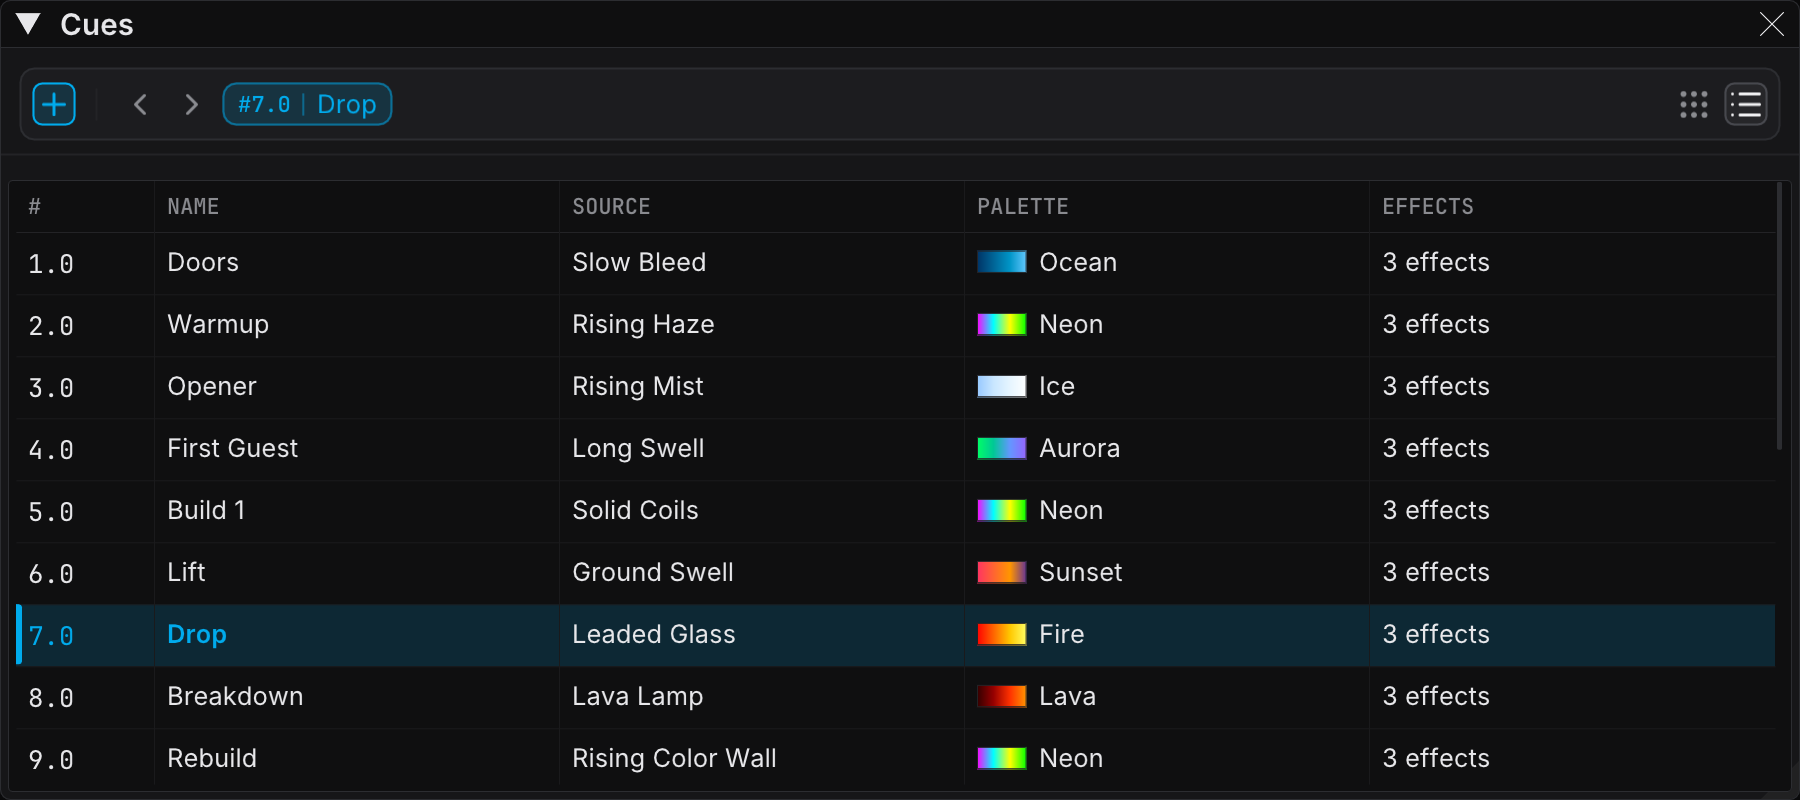
Available Columns:
| Column | Description |
|---|---|
| # | The cue number, which sets the order |
| Name | The cue name (with an asterisk when the cue is dirty) |
| Description | The optional notes |
| Source | The name or the type of the source preset |
| Palette | The name of the palette that the cue uses |
| Effects | The number of effects in the cue |
Configuring Columns:
Right-click a column header to show or hide a column. Every column except Description is visible by default.
Only the # column has a fixed width. The font sets that width, and the column holds a cue number and no more. All other columns share the remaining width equally. A wider panel makes all of them wider, and a narrower panel makes all of them narrower.
Inline Editing:
Click or double-click an editable cell to change it in the list:
| Field | Trigger | Description |
|---|---|---|
| Cue Number | Click | Change the position of the cue in the sequence |
| Cue Name | Double-click | Rename the cue |
| Description | Double-click | Add or edit the notes |
To accept your edit, press Enter or click outside the edit field. To cancel, press Escape.
Effects Column:
The Effects column shows the number of effects in the cue, for example "2 effects".
Hover Preview:
Hover over the # column of a row to see the same rich preview as the thumbnail grid. The preview holds the image of the cue, plus its name, number, description, source, palette and effect names.
The # column is the only part of the row that opens the preview. The other columns stay clear, because you read and edit them. The preview does not cover the table while you work in it.
The list preview and the thumbnail preview have separate switches in Settings → Interface, under the master hover-preview toggle. You can keep the preview in the grid and disable it in the list.
Thumbnail View
Thumbnail View shows the cues as a responsive grid of visual previews. This view is best during a live performance, because you find a cue by its look.
The lead image at the top of this page shows Thumbnail view.
Features:
| Feature | Description |
|---|---|
| 16:9 Aspect Ratio | The tiles carry the same aspect as the canvas, and they stay in step with the content of the cue |
| Cue Number Overlay | Each thumbnail shows the cue number in the bottom-left corner |
| Responsive Grid | The number of columns follows the panel width and the tile zoom |
| Tile Zoom | The slider in the action bar sets the tile width, from 72 to 180 pixels |
| Hover Preview | Hover over a tile for a live preview and the cue details |
Renaming Cues:
In Thumbnail View, right-click a cue and select Rename to open a rename dialog. Enter the new name. Then click OK.
Thumbnail Generation:
The thumbnails are a derived cache, and you do not maintain them. FXCanvas
renders a tile when you save a cue. For a shader cue, FXCanvas renders the tile
again offscreen after each change of the cue content, so the tile always shows
the current content. A file-source cue keeps the tile that FXCanvas saved with
it, because FXCanvas cannot render a video or an image again through the shader
preview.
There is no "Regenerate Thumbnail" command any more, because nothing is left to
do by hand. FXCanvas stores the thumbnails in the Cues/Thumbnails/
directory of the show.
A show from an earlier version holds square thumbnail files. Those tiles look slightly stretched until FXCanvas captures each cue again.
When the source of a cue is not installed on this machine, the tile shows a placeholder and a warning instead of the saved image. An old picture of a look that FXCanvas cannot recall is worse than no picture.
Visual State Indicators
Active Cue
Both views mark the cue that is loaded:
- List View — a blue tint highlights the active row
- Thumbnail View — the active thumbnail has a blue border
Only one cue has the blue mark: the cue that is on the output. You cannot select a cue row, and a single click does not move the blue mark. To make a different cue active, double-click it, use the context menu, or use the Previous and Next buttons.
Dirty State
When the live look no longer matches the saved cue, the cue is "dirty". FXCanvas marks this state:
- List View: an asterisk (*) appears after the cue name, for example "Intro *"
- Thumbnail View: the thumbnail border changes to an orange glowing border
- Panel tab: the tab of the Cues panel shows an orange overline
What Makes a Cue Dirty:
Everything that changes the look. About once each second, FXCanvas captures the live state and compares it with the current cue, inside the recall scope of that cue. The comparison sees every change: a new source, an effect that you add or remove, a slider, or a knob. It also sees an effect that you bypass and a palette color that you retune.
The state is a comparison and not a list of events, so an undo of your change clears the asterisk again.
Only the items in the recall scope of the cue count. A palette-only cue does not go dirty after a source change, because a fire of that cue does not restore the source.
The dirty mark tells you that Update Cue did not yet commit your work. Live changes never write themselves into a cue. They are still crash-safe, because the show session autosaves them.
Warning Statuses
FXCanvas marks a cue that it cannot recall completely on this machine, before you fire it. A warning triangle appears on the row in List View, and on the tile corner in Thumbnail View. The tooltip names each item that FXCanvas cannot resolve:
| Status | Meaning |
|---|---|
| Missing source | The source type of the cue is not installed here, often an ISF shader that lives on another machine |
| Effect type unavailable | One or more effects in the chain are not available in this build |
| Missing media file | A file-based cue points at media that is no longer in the library |
| Missing DMX map | The bound map name does not exist in the loaded rig |
| No rig loaded | The cue needs a map, but no rig is loaded to resolve it against |
If the source of a cue is missing, FXCanvas refuses to fire the cue and gives a notification. FXCanvas does not apply the palette and the effects over the running look. Open the Cue Editor to see the same statuses in context, and to repair what you can repair.
Creating Cues
Saving Your Current State as a Cue
To create a new cue from your current visual state:
- Set your source, effects, and composition to the look that you want
- Click the Save Cue button (plus icon) in the action bar
- Enter a name for the cue in the dialog
- Click Save
The dialog suggests the name "Cue X", where X is the next number in the sequence. You can use any descriptive name.
You Do Not Have to Save Presets First
Nothing stops you before you save a cue. A cue stores the parameter values themselves. The preset library adds nothing to the playback, so you do not have to open it first.
If a look inside a cue deserves a place in your library, open the cue in the Cue Editor. Then use Save as Preset beside the source or the effect that you want.
Cue Naming
Good cue names help you to remember each look during a live performance. Use a name that describes one of these:
| Category | Examples |
|---|---|
| Visual style | "Warm Ambient", "High Energy Pulse", "Cool Sweep" |
| Song section | "Intro", "Verse", "Chorus", "Bridge", "Drop" |
| Moment | "Opening Look", "Build Up", "Impact", "Cooldown" |
Triggering Cues
Loading a Cue
There are several ways to trigger a cue:
- Double-click: double-click a cue in the list or in the grid to load it at once
- Context menu: right-click a cue and select Load Cue
- Previous / Next: step through the cues in number order
- Remotely: over OSC, with a MIDI or keyboard mapping, or with the REST API
In Settings → Interface you can change the panel gesture from double-click to single-click, for both views at once.
When a cue loads, FXCanvas applies everything inside its recall scope. The scope holds the source and its parameters, the captured palette colors, and the effects chain. It also holds the composition, the live settings, the tempo, and the bound DMX map. FXCanvas leaves every item outside the scope exactly as it is.
A remote trigger runs a real recall, and does not only highlight a row. OSC, the mapping actions, and the REST endpoints all run the same recall as the panel.
Current Cue Status
A chip in the action bar, beside the Previous and Next buttons, names the cue that is loaded:
- The chip always shows the cue number, for example
#6.0 - When the cue has a name, the name follows the number after a thin rule
- An unnamed cue shows the number alone. FXCanvas never writes a placeholder name
When no cue is loaded, the chip disappears. On a narrow panel the chip drops the name first. If the space is still too small, the whole chip disappears, and the view toggles stay reachable.
Unsaved changes do not appear on the chip. They tint the overline of the Cues panel tab orange. That overline stays visible when the panel is docked behind another one.
Cue Tooltips
In Thumbnail View, hover over a tile. In List View, hover over the # column of a row. The tooltip shows these details:
- The cue name and number
- The description, when the cue has one
- The source type
- The palette name
- The effect count and the effect names
The effect names are the names that the Effects panel shows, not the stored identifiers. A long chain of effects is cut to the number of names that fit on the screen. A final line then counts the names that are not shown.
Leaving a Modified Cue
A new cue over unsaved changes destroys that work. FXCanvas never lets that happen silently.
If you fire a cue from the Cues panel and the cue that you leave is dirty, a dialog gives three answers:
| Answer | Result |
|---|---|
| Update "<name>" | Commits your changes to the cue that you leave, then fires the new cue |
| Discard & Continue | Fires the new cue and deletes the changes |
| Cancel | Keeps you on the current cue |
Tick Don't ask again to stop the dialog. You can enable it again in Settings → Interface, under "Confirm before leaving a modified cue".
A safety net behind the dialog is always active. Before a cue replaces a modified cue, FXCanvas stashes the look that you leave. A toast appears instead of the dialog in two cases. The first case is a disabled dialog. The second case is a trigger over OSC, a mapping, or REST, where FXCanvas cannot ask you.
"Drop" changes discarded Update "Drop" to keep them, or dismiss.
The Update "<name>" button on that toast writes the stashed look, and not the look on screen now. The button is still correct after the next cue is already up. The toast lasts about six seconds, and it pauses while you hover over it.
A second fire of the cue that you are already on is the revert gesture. FXCanvas never guards it and never stashes for it.
The Cue Editor
Right-click a cue and select Edit Cue... to open the editor. The editor is one non-modal window. Open it, and leave it open while you work through your cues.
The left side shows what the cue is. A live animated preview renders the snapshot of the cue offscreen, so you see the look and the output does not change. A file-source cue shows its saved thumbnail instead, under the caption "Video preview unavailable - showing the saved thumbnail." Fire Cue recalls the cue for real when you want it live. Below the preview, Identity holds the name, the cue number and your notes (click a note to edit it), and DMX Map holds the map binding.
The right side is Contents. One row shows each category and lists what the cue captured. The recall switch of that category is on its own header row.
| Category | What the switch controls |
|---|---|
| Source | The captured source and its parameters, with Save as Preset |
| Effects | The numbered effect chain, each with Save as Preset |
| Palette | The captured colors |
| Composition | Hue, saturation, mirror and symmetry |
| Globals | The dimmer, speed, direction and color mode, editable in place |
| Tempo | The BPM that the cue holds, editable in place |
| DMX Map | The bound map, in its own card on the left |
A switched-off category greys its values, and does not hide them. The cue keeps those values. The switch only controls whether a fire installs them. Save as Preset stays available in a switched-off category, because you can add a captured source to your preset library at any time. Recall does not apply.
The editor shows each unresolvable item in the warning state, with the same words as the Cues panel. The editor is the place to diagnose a flagged cue, and not a second opinion about it.
You edit the parameters where the parameters live. The loop is Fire Cue, then your changes in the normal panels, then Update Cue. The editor owns the metadata, the recall scope, the globals and the map binding of the cue.
Recall Scope
A cue does not have to hold a whole look. The recall scope is a set of switches. Six categories carry their switch on their own header row in Contents. The seventh, DMX Map, carries its switch on the DMX Map card. A fire of the cue touches only the categories that are switched on:
| Scope | When on |
|---|---|
| Source | Installs the captured source and its parameters |
| Effects | Rebuilds the effects chain from this cue |
| Palette | Applies the captured colors |
| Composition | Applies the hue, saturation, mirror and symmetry |
| Globals | Applies the captured dimmer, speed, direction and color mode |
| DMX Map | Activates the bound map |
| Tempo | Sets the beat clock to the captured tempo |
Every switch is enabled by default, so a cue without a scope change behaves in the normal way. Disable the switches to build console-style tracking. A palette-only cue recolors the show and leaves the source in operation. A map-only cue changes the lighting behavior and leaves the visuals alone.
The scope also decides what counts as dirty. A cue is dirty only about the items that it recalls.
Binding a DMX Map
The DMX Map section binds a map to the cue by name. The cue travels with the show, and it resolves against the rig that is loaded.
If the bound name does not exist in the loaded rig, the section states this. It offers Create map '<name>', which creates an empty map under that name, so the cue resolves. Add the layers to it in DMX Manager → Mapping, which the Go to Maps link opens directly. With no rig loaded at all, the editor states that instead, because there is nowhere to create the map yet.
Organizing Cues
Cue List Order
The panel sorts the cues by cue number, in ascending order. Use the cue numbers to control the order:
| Cue Number | Name |
|---|---|
| 1.0 | Opening |
| 2.0 | Build |
| 2.5 | Transition |
| 3.0 | Drop |
| 4.0 | Break |
Use decimal cue numbers such as 1.5 and 2.5 to insert a cue between two existing cues. A renumber of the whole list is not necessary.
Updating Cues
To update an existing cue with your current visual state:
- Right-click the cue that you want to update
- Select Update Cue
- FXCanvas replaces the cue with your current source, effects, palette, composition, live settings, and tempo
Update Cue keeps the items that identify the cue, and not the items that describe the look. The number, the name, the description, the creation time, the DMX map binding, and the recall scope all stay. FXCanvas renders the thumbnail again to match.
Deleting Cues
To delete a cue:
- Right-click the cue in the list
- Select Delete
- Accept the deletion in the dialog
Delete a cue only when you are sure, and never in a hurry before a performance. FXCanvas deletes the cue from the disk, and you cannot recover it.
Context Menu Options
Right-click any cue to access these options:
| Option | Description |
|---|---|
| Load Cue | Fires this cue at once |
| Edit Cue... | Opens the Cue Editor on this cue |
| Update Cue | Replaces the cue content with the current visual state |
| Rename | Changes the cue name |
| Delete | Deletes the cue permanently |
The menu is identical in both views. Load and Edit sit together, because they are the pair that you use most. Fire the cue to see it, and open the cue to understand it.
Live Performance Workflow
Setting Up Cues Before a Performance
A typical pre-show setup workflow:
- Open or create a show for the event
- Build your first look with sources, effects, and palettes
- Save the look as a cue with a descriptive name
- Build your next look and save it as another cue
- Repeat until you have all of the looks that you need
- Test each cue. Load them in sequence.
- Adjust and update the cues
Using the Live Panel
The Live panel works together with the Cues panel during a performance. It holds everything that you touch mid-show, in four sections:
| Section | Controls |
|---|---|
| Canvas Controls | Dimmer, Saturation, and Hue Shift knobs. Mirror X/Y and Symmetry H/V toggles. Blackout and reset icons in the heading. |
| Source Globals | Direction and Speed knobs that override the active source, with a reset icon |
| Tempo | TAP and RESYNC, BPM slider and input, Modifier and Quick Set rows. Tempo source and Link broadcast in the gear menu. |
| Color | Transition Speed and Animation Speed knobs. Color mode in the gear menu. |
The blackout icon (power symbol) in the Canvas Controls heading cuts the output to black. A second click restores the previous dimmer level.
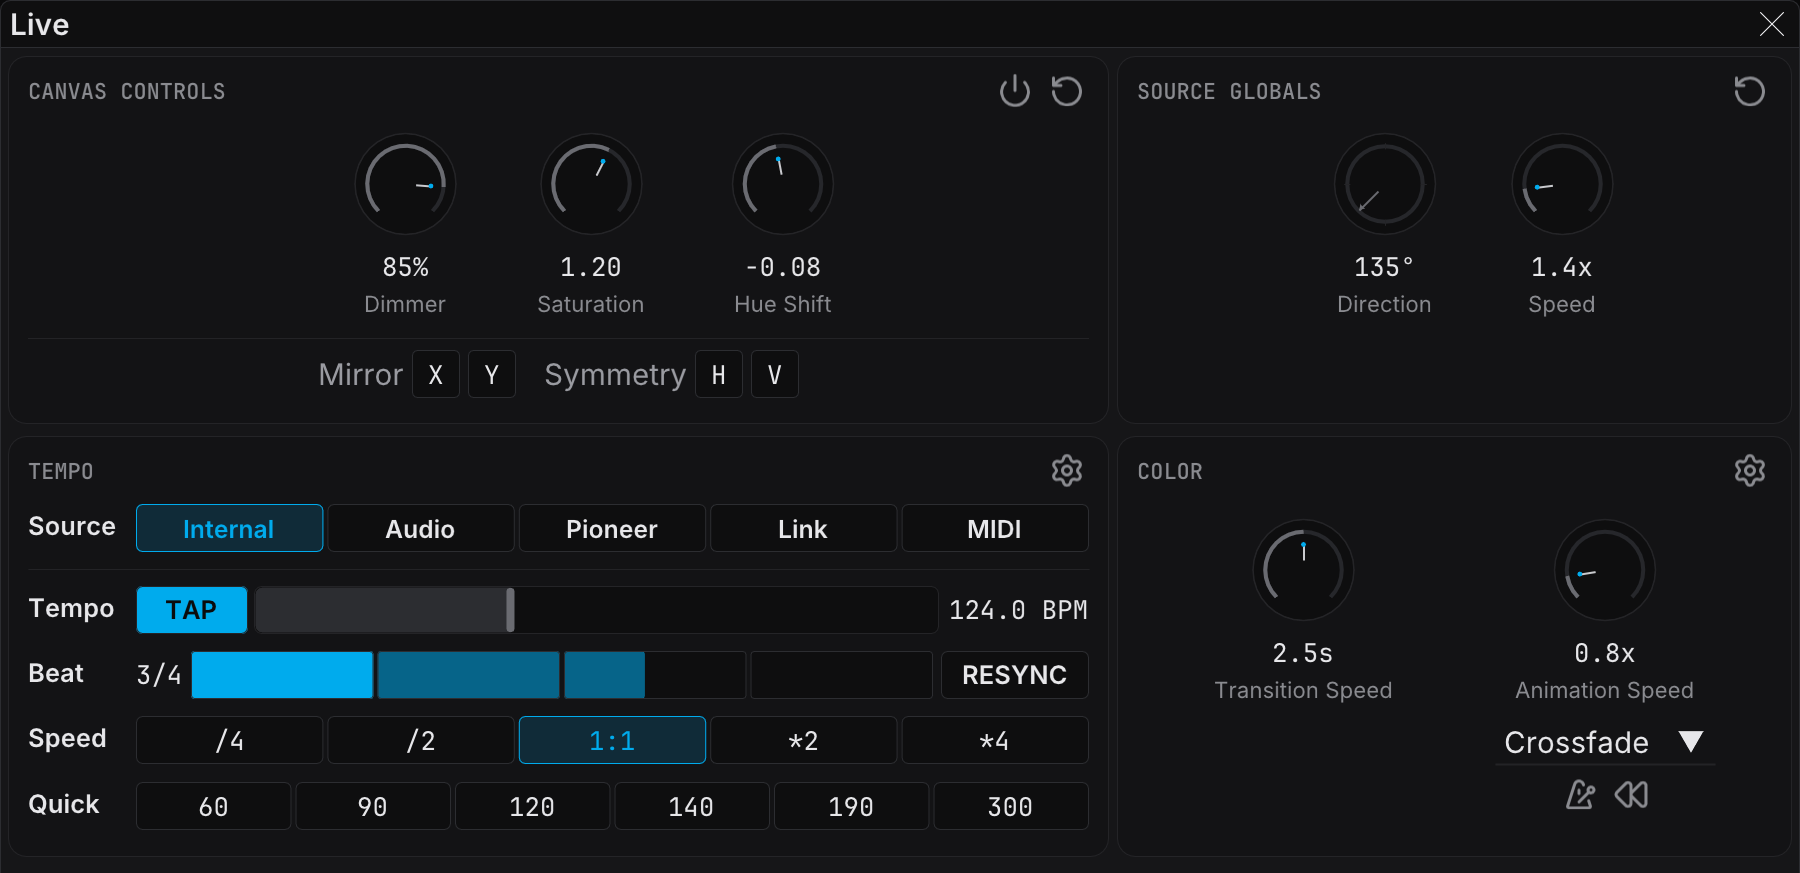
These controls apply on top of the active cue, so you can adjust the look in real time.
Quick Switching During Performance
During a performance you can change the look at once in three ways:
- Double-click the next cue in the Cues panel
- Use the Previous and Next buttons to step through the cues in order
- Use the context menu to load a specific cue
The transition is immediate, because there is no crossfade between two cues. For a smooth transition, use similar source types in adjacent cues. You can also lower the master dimmer before the change and raise it after.
Tips and Best Practices
Cue Organization Strategies
| Strategy | Description | Best For |
|---|---|---|
| By Song Section | Name cues after song parts (Intro, Verse, Chorus, Bridge, Outro) | Fixed setlists |
| By Energy Level | Name cues by intensity (Ambient 1, Medium Build, High Energy, Peak) | Flexible sets |
| By Visual Style | Name cues by their look (Warm Sweep, Cool Pulse, Rainbow Flow) | Live cueing to music |
| Numbered Sequences | Use cue numbers to hold a specific order | Complex shows |
Naming Conventions
Use one naming pattern for the whole show:
- Use the same capitalization everywhere
- Include the source type when it helps ("Plasma - Warm", "Sweep - Blue")
- Keep the names short enough to read during a performance
- Do not use special characters
Pre-Show Preparation Checklist
Before a performance:
- Open the correct show file
- Look at the cue list for warning triangles, and clear them before doors
- Test each cue to make sure that it loads correctly
- Make sure that the output resolution is correct for the venue
- Make sure that the NDI outputs are enabled and named correctly
- Test the blackout icon in the Canvas Controls heading of the Live panel
- Set the master dimmer to your start level
- Load your first cue
Backup Recommendations
Protect your show files:
- The show folder is in
Documents/FXCanvas/Shows/ - A copy of the folder saves the show and its cues, but not the presets, the media or the rig that they reference. Use File → Export Show... for a backup that is complete on its own.
- Keep backups on external storage for important performances
- Test a backup. Import it on another machine and open the show.
Related Topics
- Sources — The available source types and their parameters
- Video Playback — Trigger video and image files from cues
- Effects — The effects chain
- Palettes — Create and manage color palettes
- BPM Sync — Sync parameters to the beat
- Outputs — Configure the NDI outputs for your show
- DMX Output & Mapping — Bind DMX maps to cues to drive lighting per scene