Sources
Sources are the visual pattern generators that make the base visual content in FXCanvas. They produce animated colors and patterns for your lighting design. Effects can then change that content, and FXCanvas maps the result to your fixtures.
What are Sources?
A source is a GPU-accelerated shader that makes animated visual patterns. Each source type produces a different visual style. The styles go from smooth gradients that flow to rhythmic rings that pulse.
Sources have these properties for lighting work:
- Color palette integration — Sources use the active color palette instead of fixed colors
- BPM sync ready — Parameters such as Speed can sync to the beat for music-reactive visuals
- Low resolution optimized — Patterns stay clear at LED fixture resolutions
A source is your visual starting point. You select a source and adjust its parameters. The output then goes into your effects chain. FXCanvas maps the result to fixtures.
Using the Source Presets Panel
The Source Presets panel is your library of the available sources and your saved presets. The panel has two views:
| View | Icon | Shows |
|---|---|---|
| List view | list | A tree of categories, folders, and presets |
| Browser view | grip | Panes of tiles, with a picture of each look |
Two toggle buttons in the action bar select the view. FXCanvas keeps your choice between sessions. Both views hold the same content, and both load a source in the same way. The sections below describe list view first. For the tiles, read Browser View.
Browsing Sources
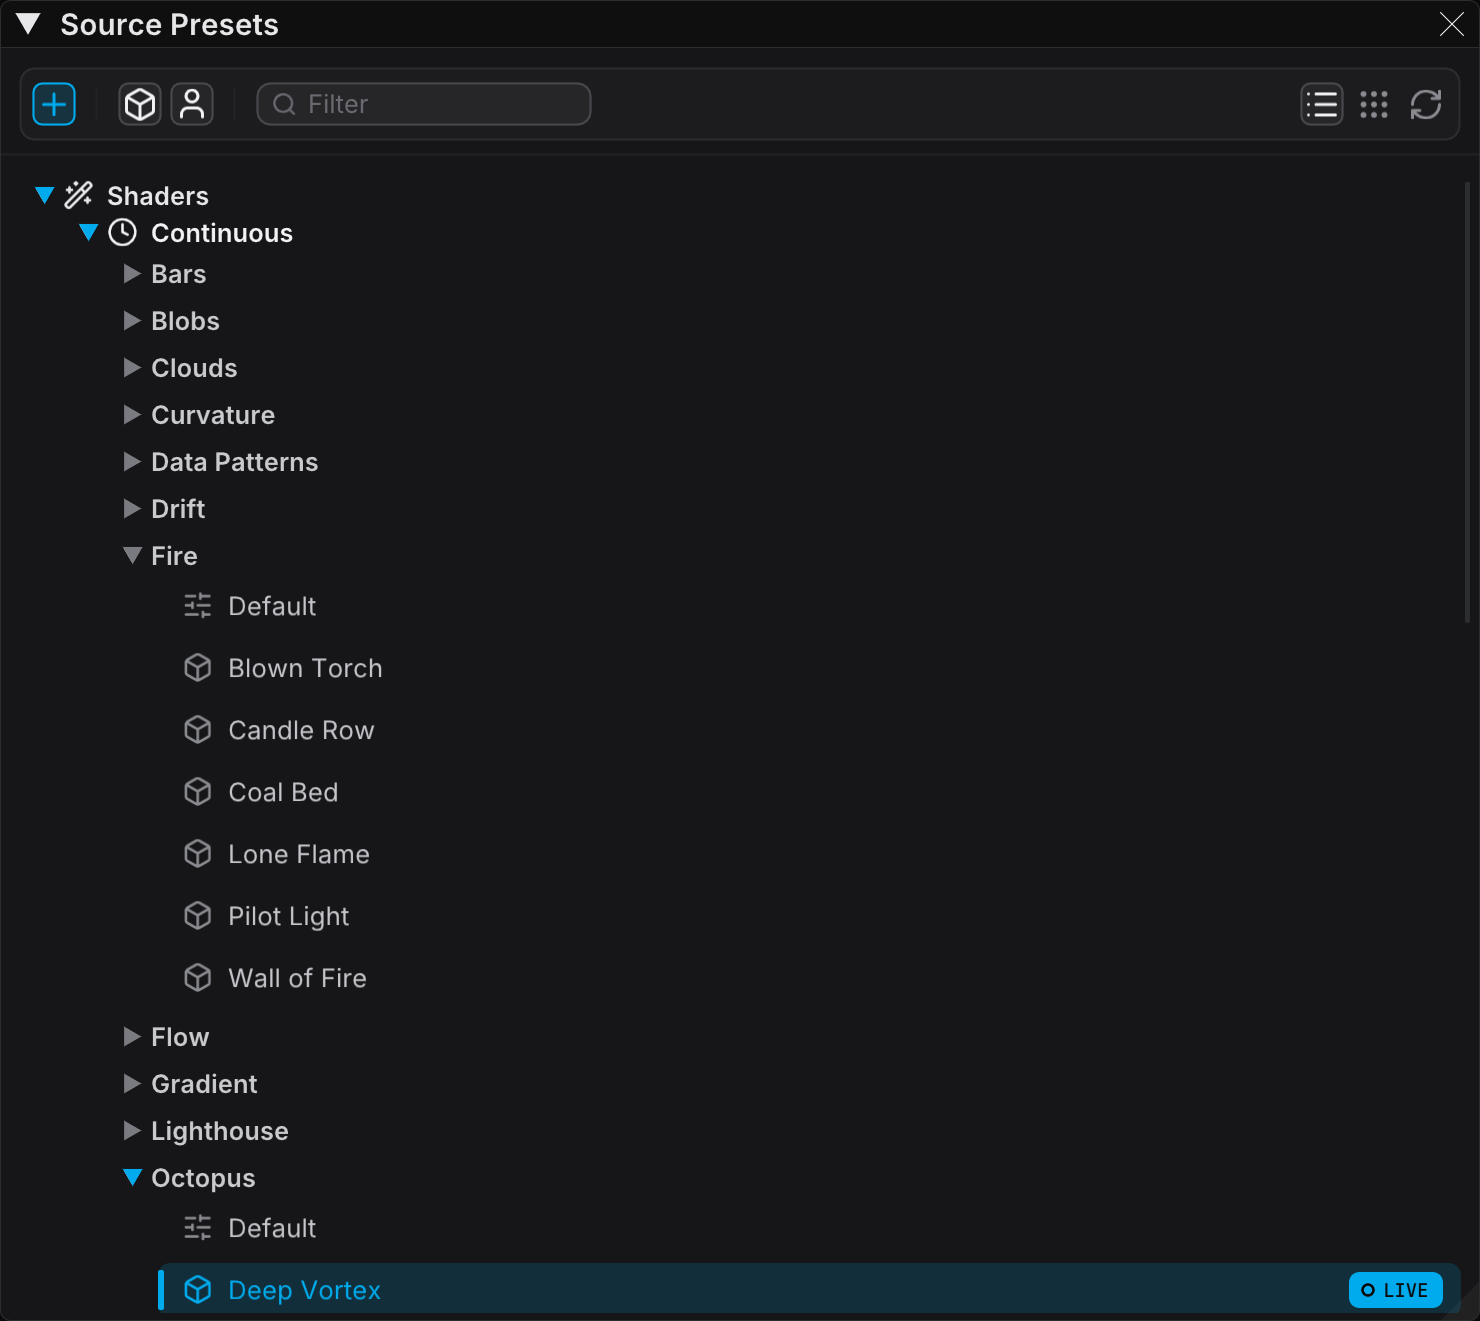
The panel groups sources by type in a tree view:
- Continuous — Sources with continuous time-based animation
- BPM — Sources that sync to the beat (BPM)
- ISF Shaders — ISF (Interactive Shader Format) shaders that you import or add by hand
- Type headers — Click the arrow to open or close a source type
- Preset list — Individual presets appear under each type
- Icons — A cube icon marks built-in presets. A user icon marks your custom presets. A sliders icon marks the Default row
The three timing folders nest under one Shaders category, beside Live Inputs and File Media.
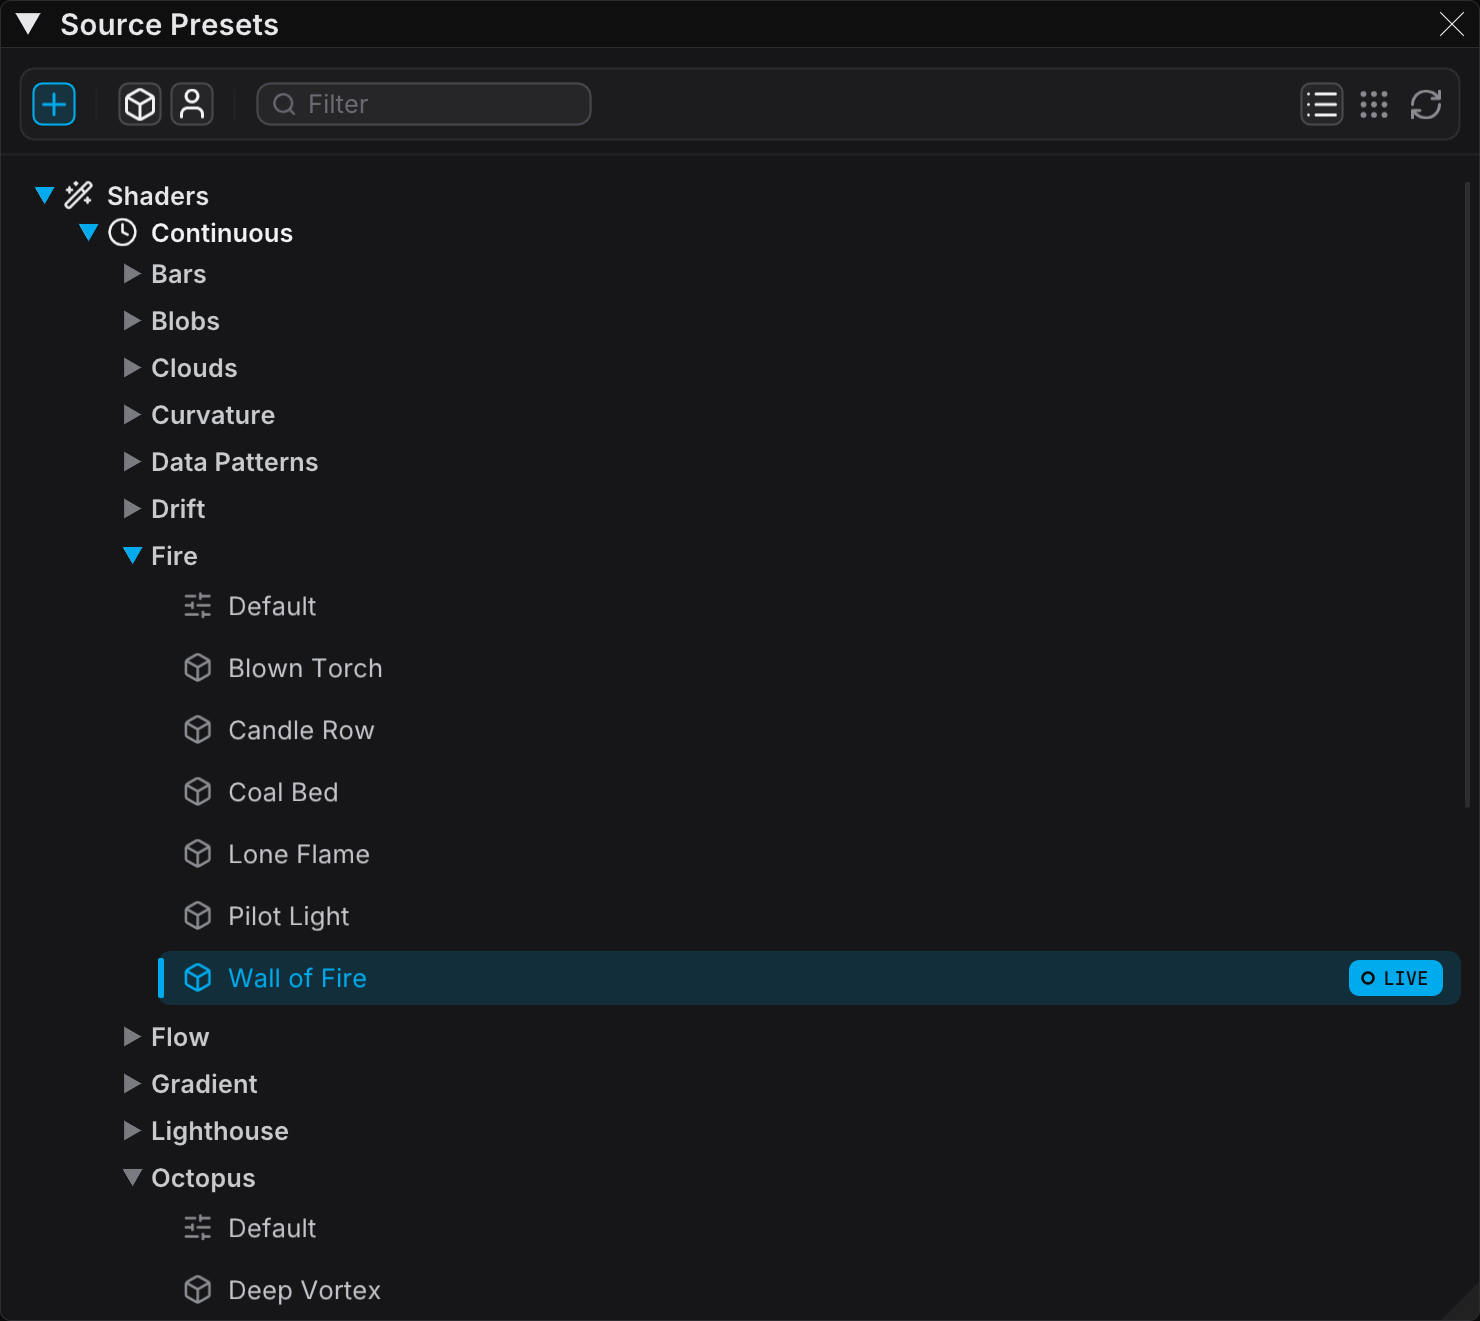
The Default Row
Every source type leads its preset list with a Default row. That row is the source at its own parameters, with no preset applied. Double-click it to load the source that way.
The row also replaces the old "no presets" caption. A source type with no presets still shows a row that you can click.
When a source runs with no preset, its Default row carries the LIVE badge, so the tree always marks what drives the output.
Loading a Source
You can load a source in three ways:
- Double-click a preset — This loads the source with the saved parameter values of the preset. Use this method for a specific look.
- Double-click the Default row — This loads the source with its own default parameter values.
- Double-click the type header — This does the same as the Default row. It is the fastest way to try a new source type.
Hover Previews
Hover any preset, or a Default row, to see a tooltip. The tooltip holds an animated preview that renders the source offscreen, in your active palette and through your effects chain. Below the preview it gives the name, the type, and the color slot count.
The preview waits for a short dwell before it starts, so a fast pass across the list costs nothing. FXCanvas also skips the render while the GPU is busy.
Every list works the same way. In the three pictures below, the same show is running the whole time: the Flow source on its Oil Slick preset, a trail and curves effects chain, and the Aurora palette. Only the hovered item changes, so each preview shows you that one substitution against everything else you already have.
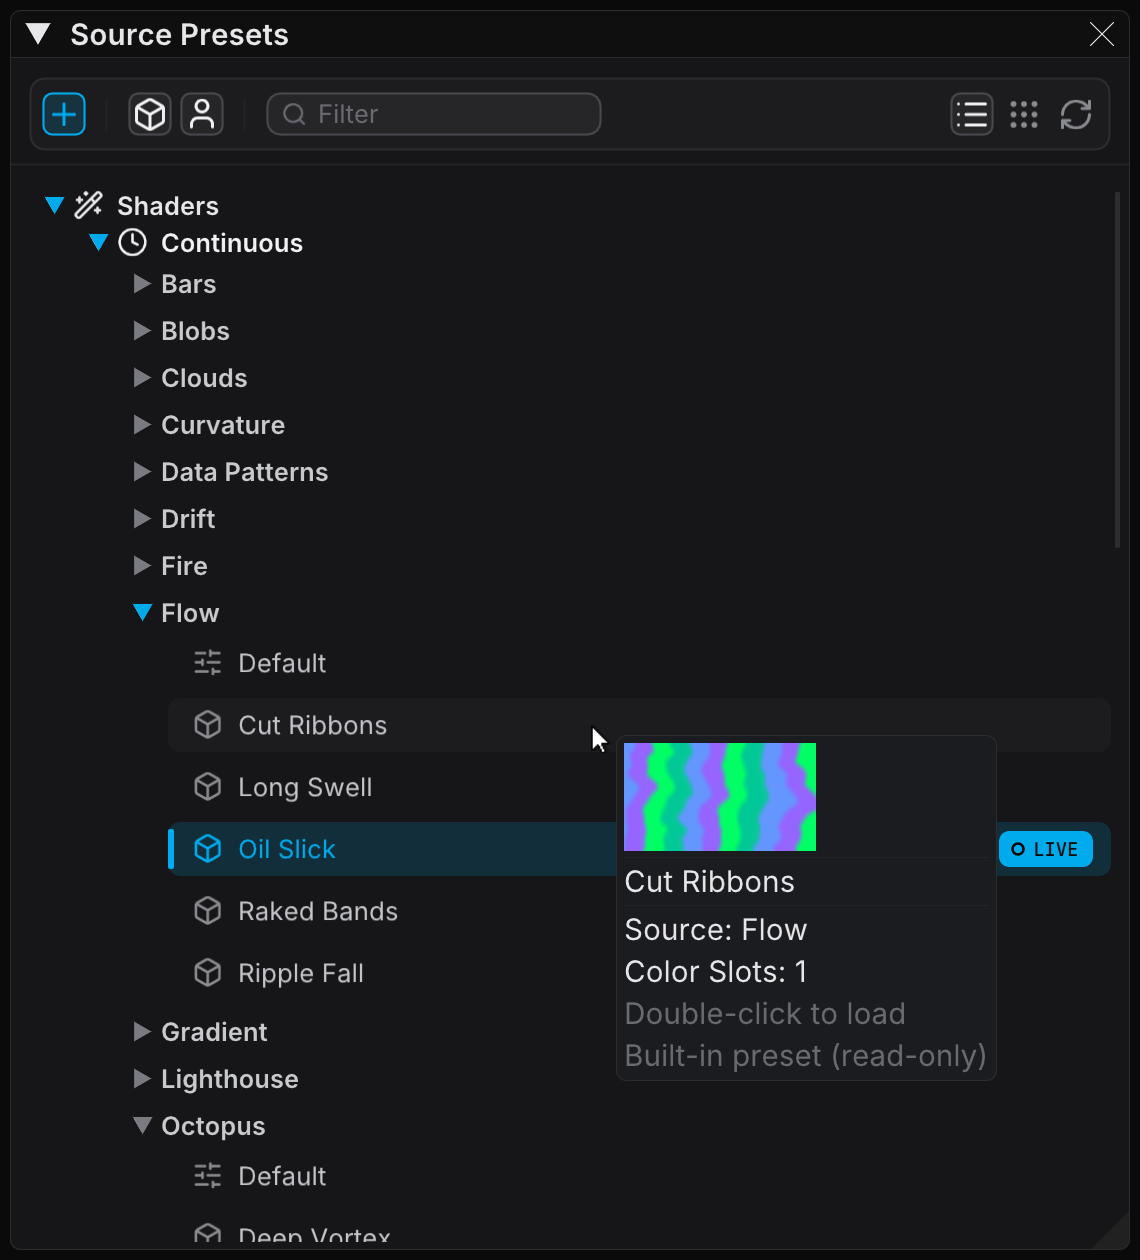
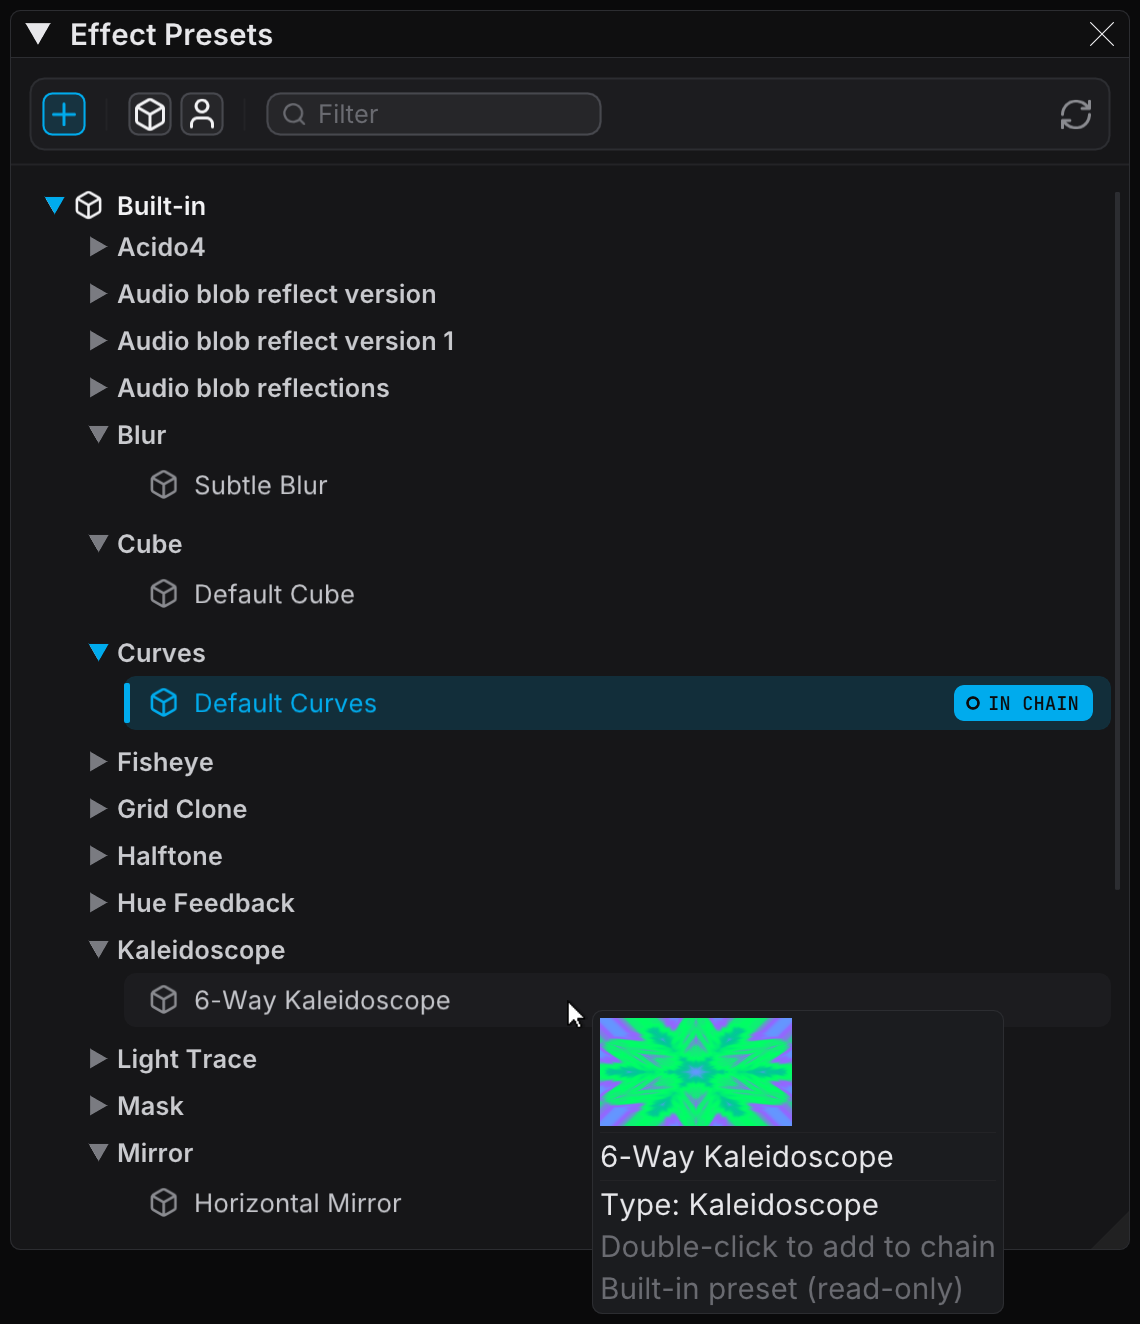
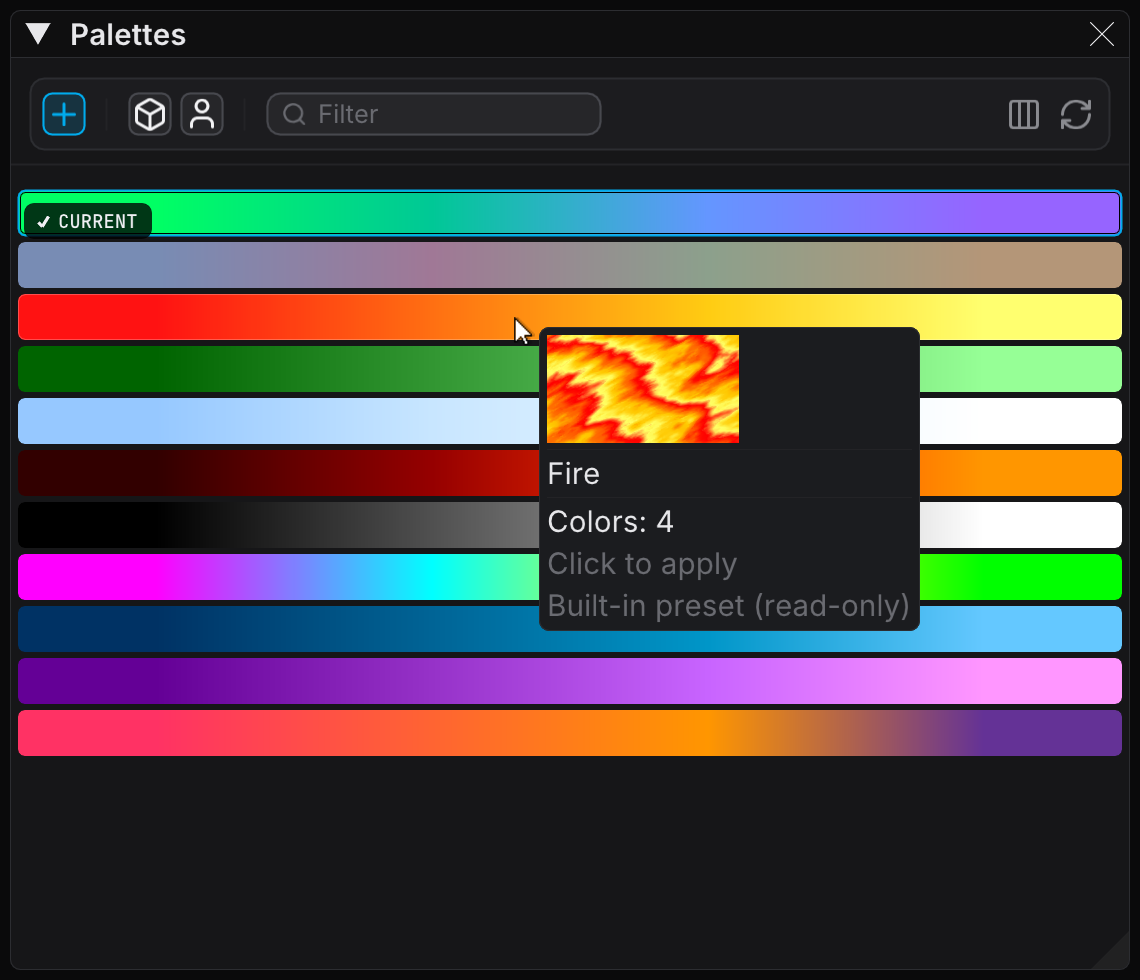
To disable previews, or to keep them for some lists only, open Edit → Settings → Interface. Clear Enable hover previews to stop every preview. To stop the previews for one list, clear its entry under Show for: — Sources, Effects, Palettes, File media, Cues - list view, or Cues - thumbnail view. Every one of them is on by default.
Most previews animate live. File media, and cues that use a file source, show a static thumbnail instead.
The two settings under What a Picture Shows also control these previews.
The Action Bar
The action bar at the top of the panel holds the panel controls in one row:
| Control | Description |
|---|---|
| Add (plus icon) | Opens the add menu for media folders |
| Scope toggles (cube, user) | Select which parts of the tree the panel shows |
| Filter field (magnifying glass icon) | Narrows the tree to the names that match your text |
| Refresh (rotate icon) | Loads the presets, the live inputs, and the file media again |
Scope Toggles
Two toggle buttons in the action bar select which parts of the tree the panel shows:
| Icon | Scope | Shows |
|---|---|---|
| Cube | Built-In | Factory presets that ship with FXCanvas |
| User | My Presets | Custom presets that you made |
You can enable both scopes at a time. FXCanvas keeps the last enabled scope on, so the bar cannot empty the tree. The Live Inputs and File Media categories have no scope toggle, and they always appear.
Text Filter
Type in the filter field in the action bar to narrow the tree. FXCanvas keeps a group when its own name matches, or when a preset under it matches.
While the field holds text, the field carries an accent ring and a clear button. Click the clear button (X icon) inside the field to see the whole tree again.
Adding Media Folders
The add button (plus icon) in the action bar opens a menu with two rows:
| Row | Action |
|---|---|
| Add media folder... | Opens a folder picker. FXCanvas adds the folder that you select to the media library and scans it |
| Manage media folders... | Opens the Media tab of the Settings window, where you enable, rescan, or remove the folders |
Add media folder... includes the subfolders, the same default that the Media settings tab uses. The new media then appears in the File Media section. For the full media library workflow, read Video Playback.
Browser View
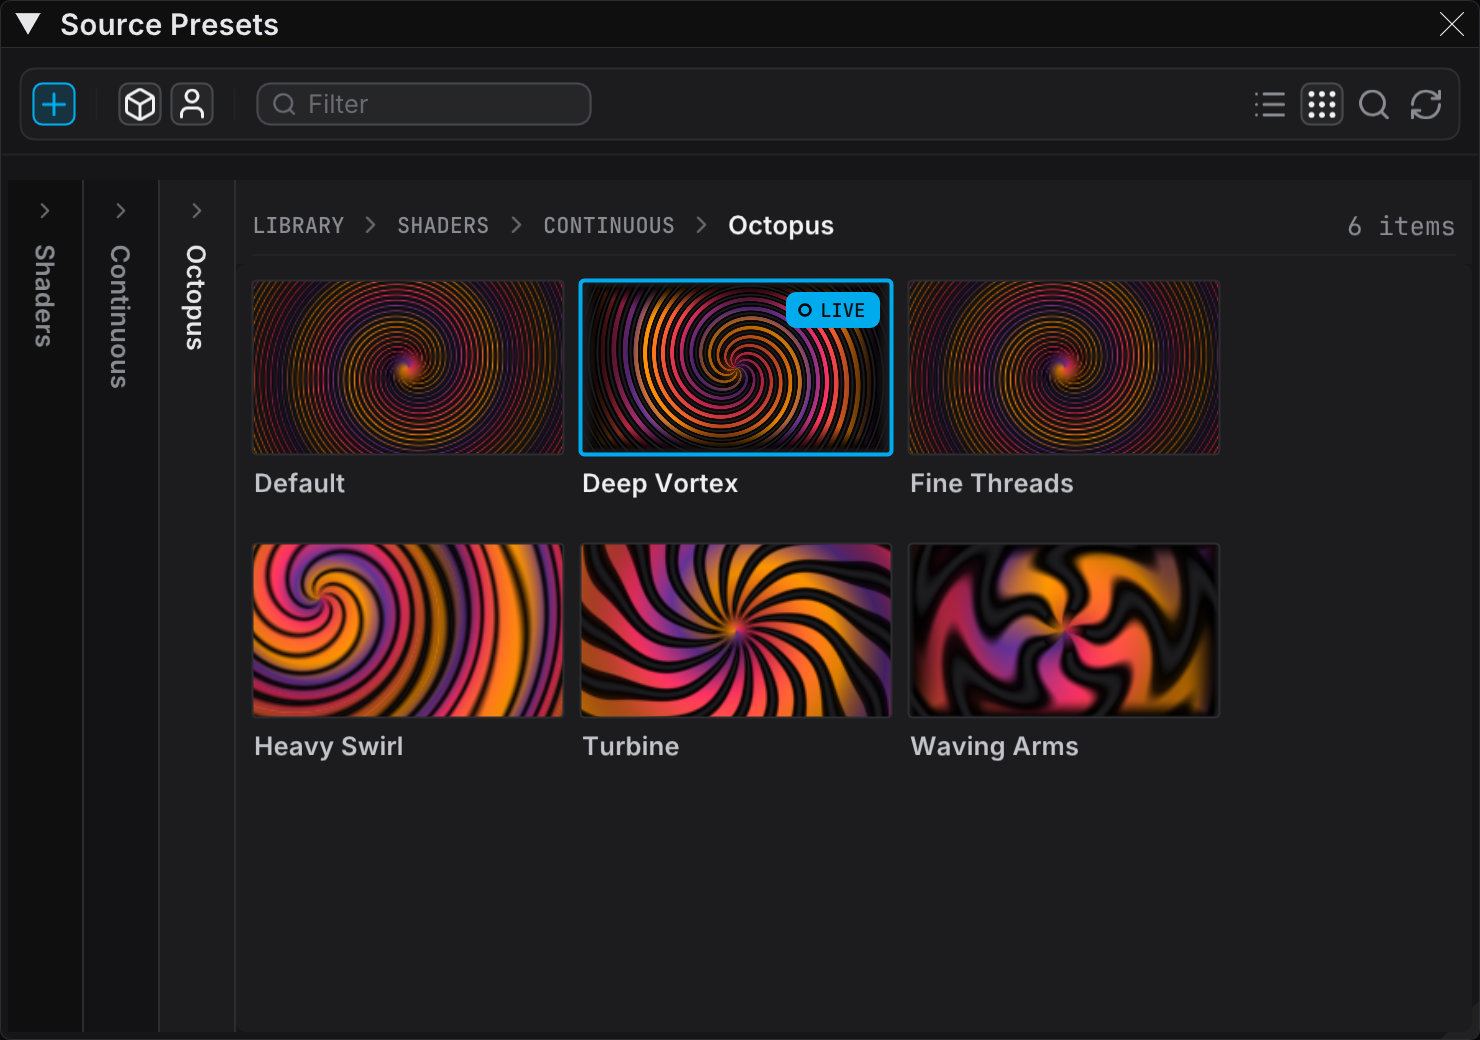
Browser view draws the library as a stack of panes and tiles. A preset tile carries a picture of the look, so you can select a source by eye.
To open browser view, click the browser button (grip icon) in the action bar. To return to the tree, click the list button (list icon).
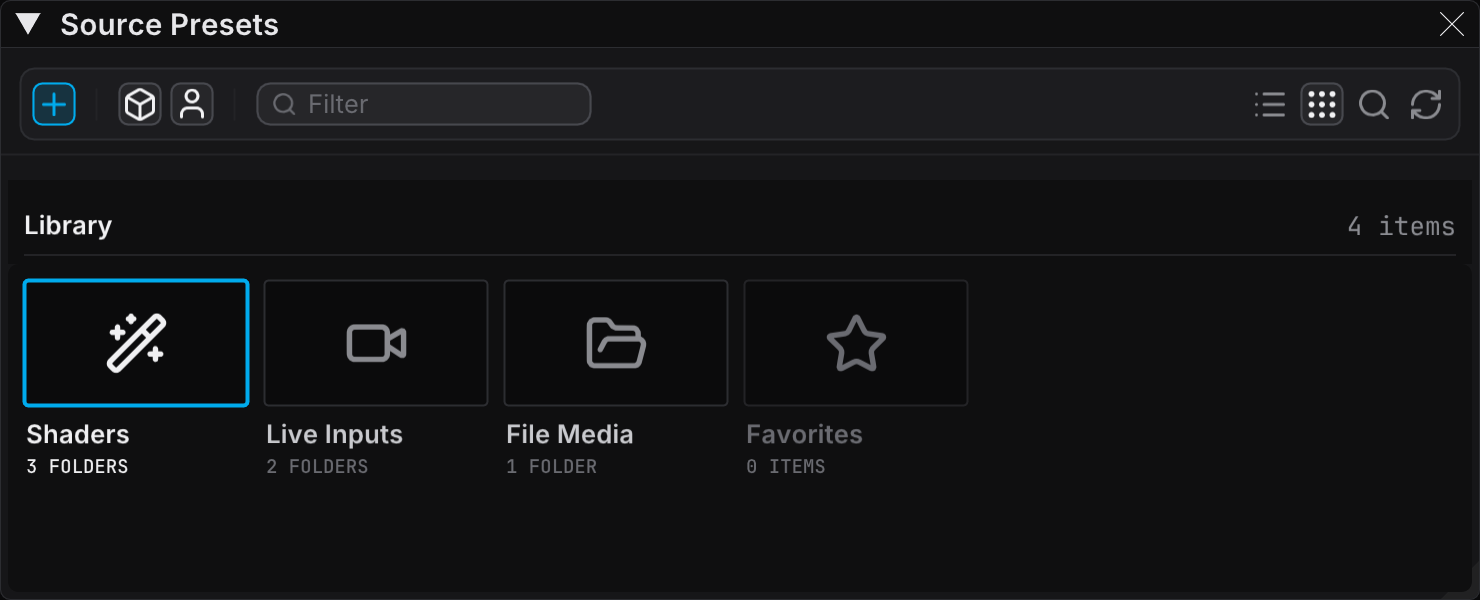
The top level holds the same groups as the tree: Shaders, Live Inputs, and File Media. A Favorites group appears last after you mark your first favorite.
Panes and Rails
Double-click a folder tile to open that folder. The level that you leave collapses to a rail at the left edge. Each rail carries the name of its own open child, so the trail reads from left to right.
One level down, the root is a single rail and the Shaders pane shows its folders as tiles.
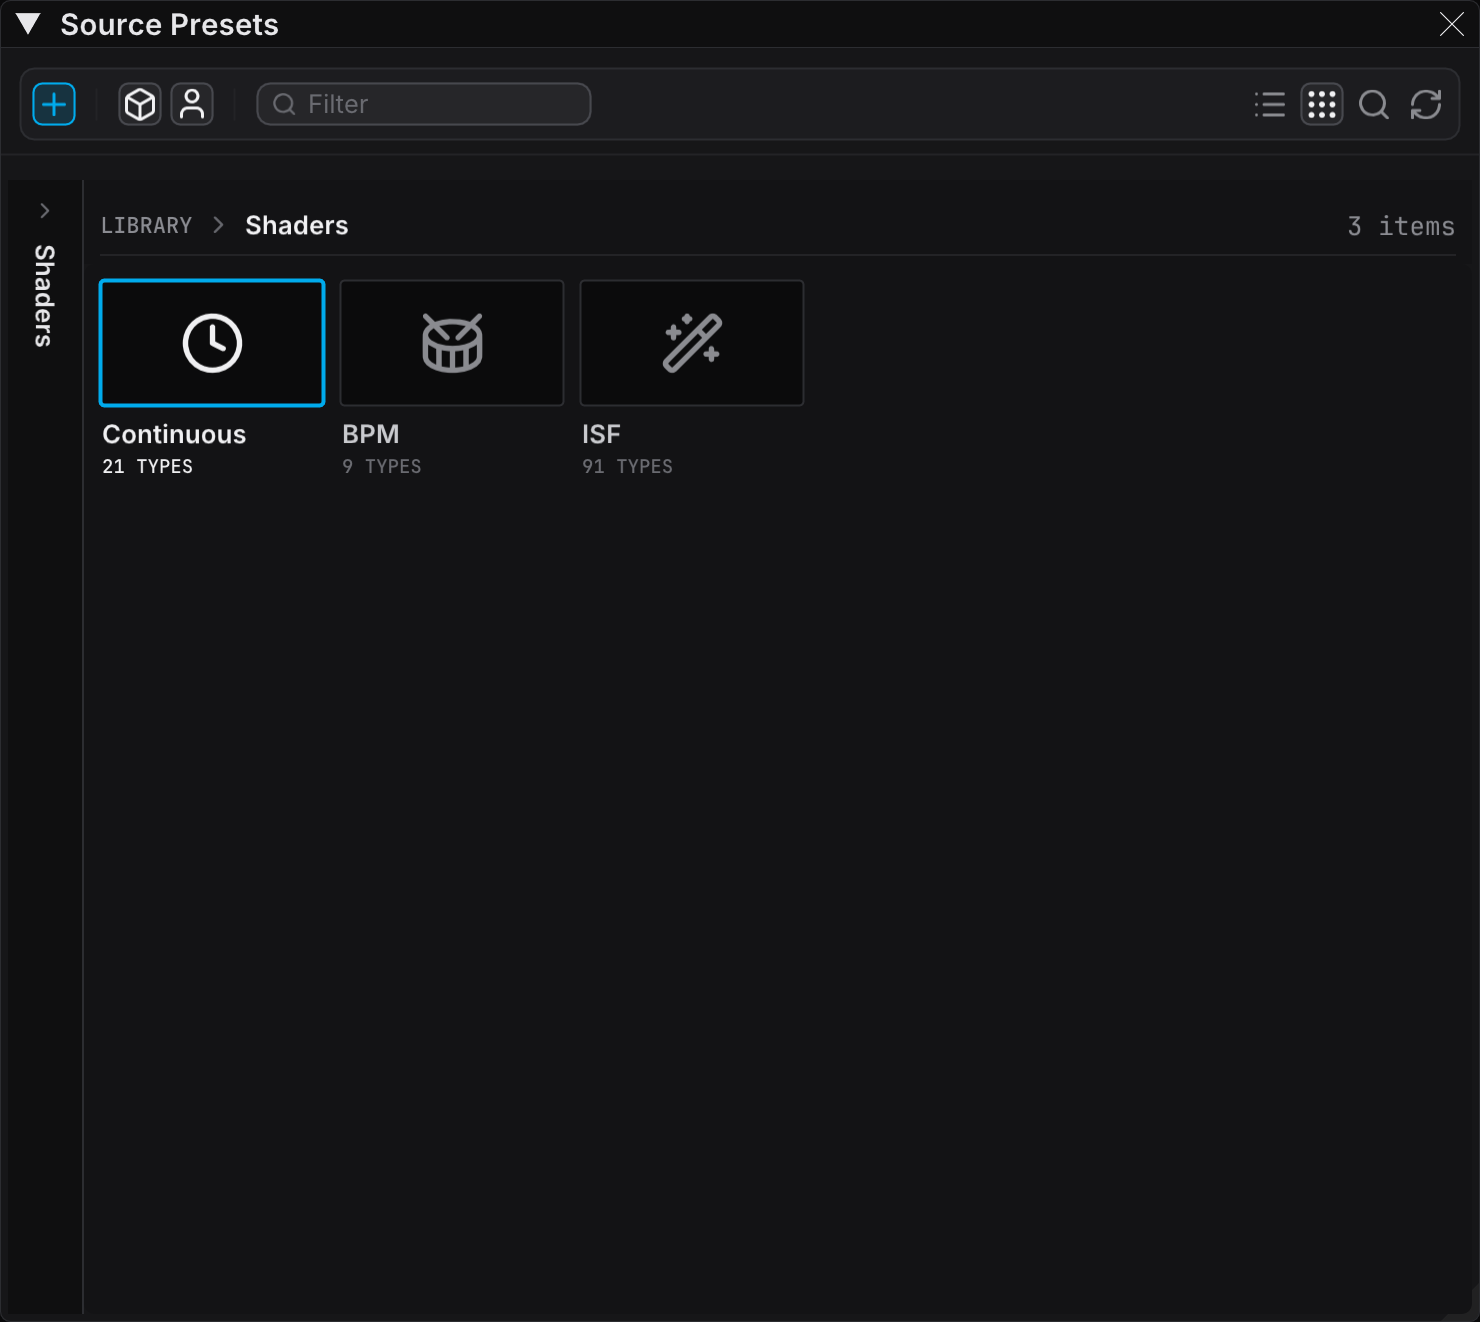
Each further level adds a rail. Here the source type level is open, two levels deeper:
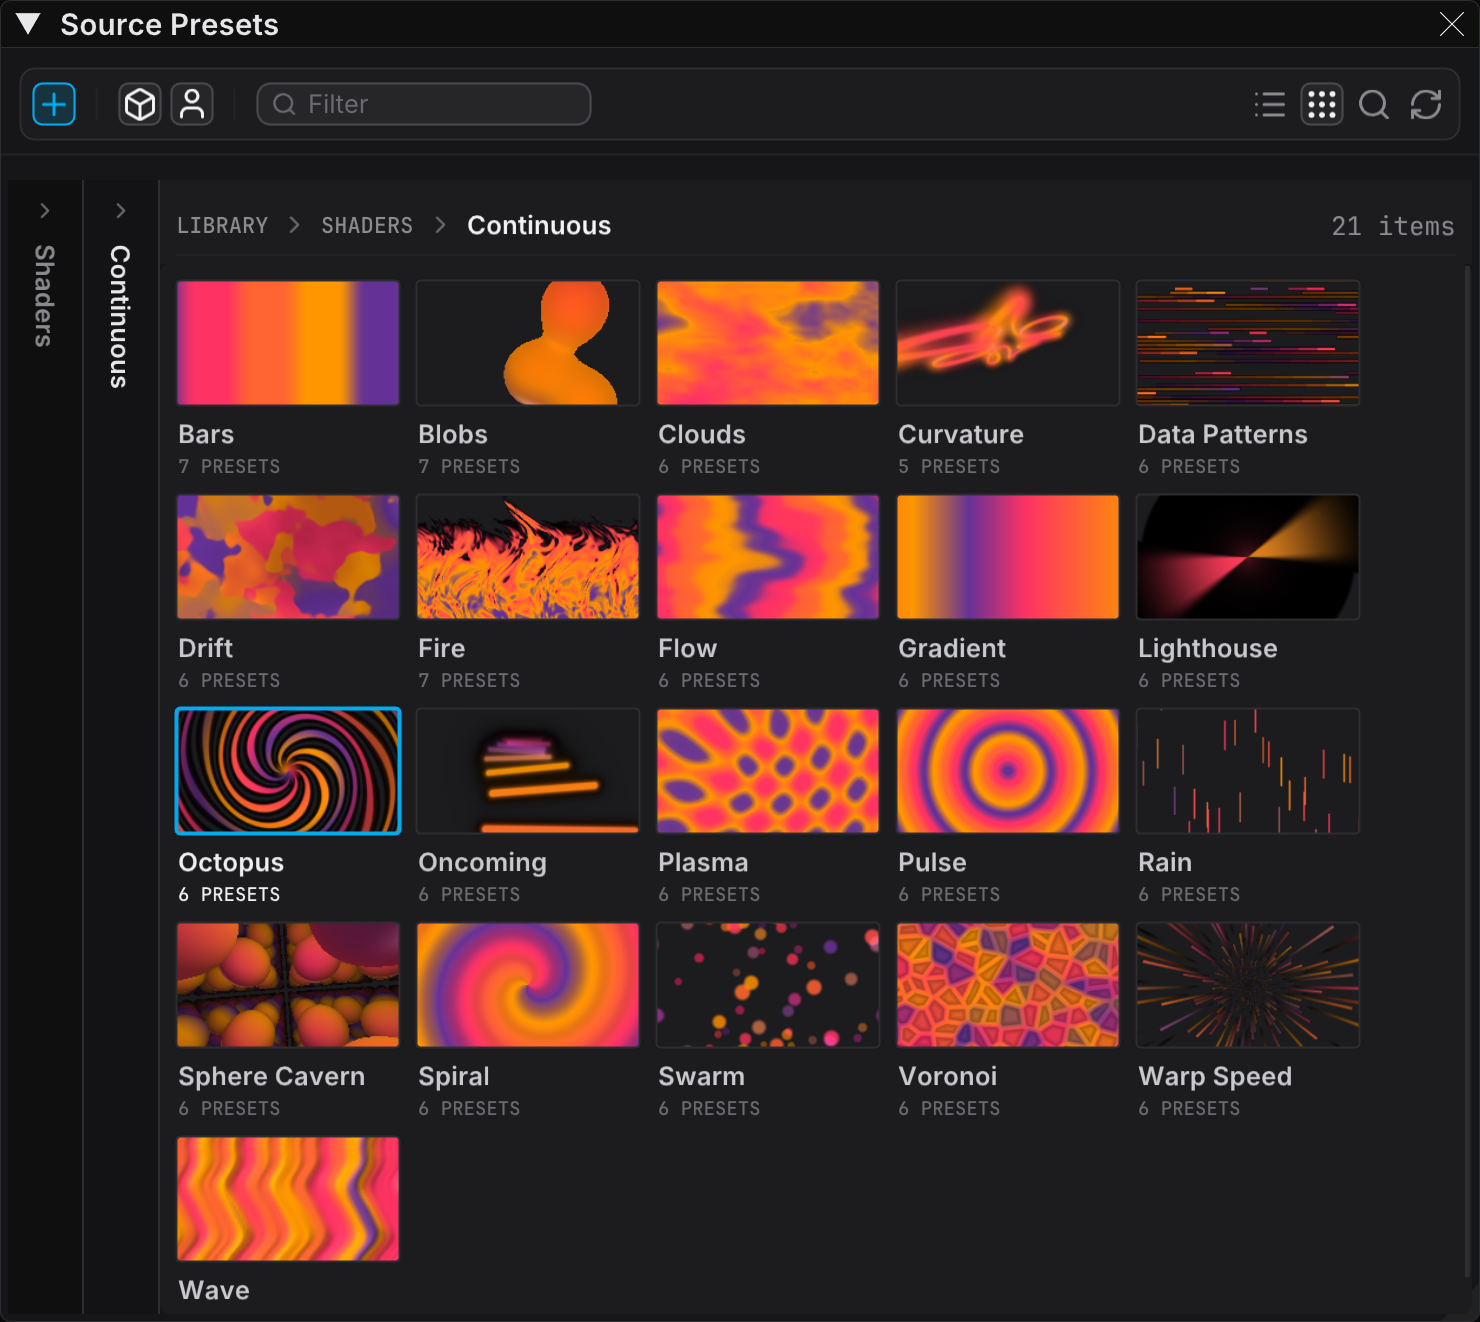
- Click a rail to open that level again. The deeper panes keep their selections
- Click a segment of the breadcrumb above the grid to go to that level
The breadcrumb gives the full path and the number of items in the open level. On a narrow panel FXCanvas drops the shallowest rails. The breadcrumb still reaches those levels.
An accent bar marks each rail on the path to the live source, so the trail to the current output stays visible at any depth.
Tiles
Every tile carries its name below a 16:9 box, and the number of items in a folder below the name.
| Tile | Box holds |
|---|---|
| Top-level folder | A glyph for that group |
| Source type | A picture of the source |
| Preset, Default | A picture of that look |
| Media file | The thumbnail of the clip or the image |
| Device | A glyph, plus a status dot |
| Gesture | Result |
|---|---|
| Click | Selects a leaf tile. A folder tile takes no selection |
| Double-click | Loads a leaf, or opens a folder |
| Right-click | Opens the menu of that tile |
FXCanvas marks the state of each tile:
| State | Appearance |
|---|---|
| Hover | A neutral lift, and the picture animates |
| Selected | A 1px accent ring |
| Live | A solid accent ring and a LIVE pill |
| Favorite | An amber star |
A media tile also carries chips for the codec, the resolution, and the duration. A device tile carries a status dot.
Only the tile under the pointer animates. The other tiles hold a still picture. FXCanvas renders those stills inside a time budget of a few milliseconds per frame, and it stops that work while the GPU is busy. A tile with no picture yet draws its glyph instead.
What a Picture Shows
Two settings in Edit → Settings → Interface control the tile pictures and the hover previews together:
| Setting | Effect |
|---|---|
| Use the current colors | The pictures use the palette of your show. Clear it to compare two presets in fixed reference colors |
| Use the effects | The pictures run through your effects chain |
Both settings are on by default. A change to either one renders every picture again.
Tile Zoom
The zoom slider in the action bar sets the tile width for the open level, from 96 to 180 pixels. Hover the slider to see which level it drives.
FXCanvas stores a width for each level, so a folder level and a preset level keep separate sizes. A folder level starts at 112 pixels, and a level with pictures starts at 156 pixels. FXCanvas saves the value when you release the slider.
Tile Menus
| Tile | Actions |
|---|---|
| Source type | Loads the preset that the row names, or Load With Defaults |
| Preset | Load, Favorite, Rename, Delete. Rename and Delete are for user presets only |
| Default | Load With Defaults, and Favorite |
| Device, media file | Favorite |
Favorites
Mark any leaf as a favorite from its menu. FXCanvas then lists that leaf in the Favorites folder at the top level.
A favorite is a reference to the leaf, and not a copy of it. The tile of the leaf itself carries the live state, and the reference does not take it. FXCanvas removes a reference that no longer resolves, for example after you delete the preset.
Source Parameters Panel
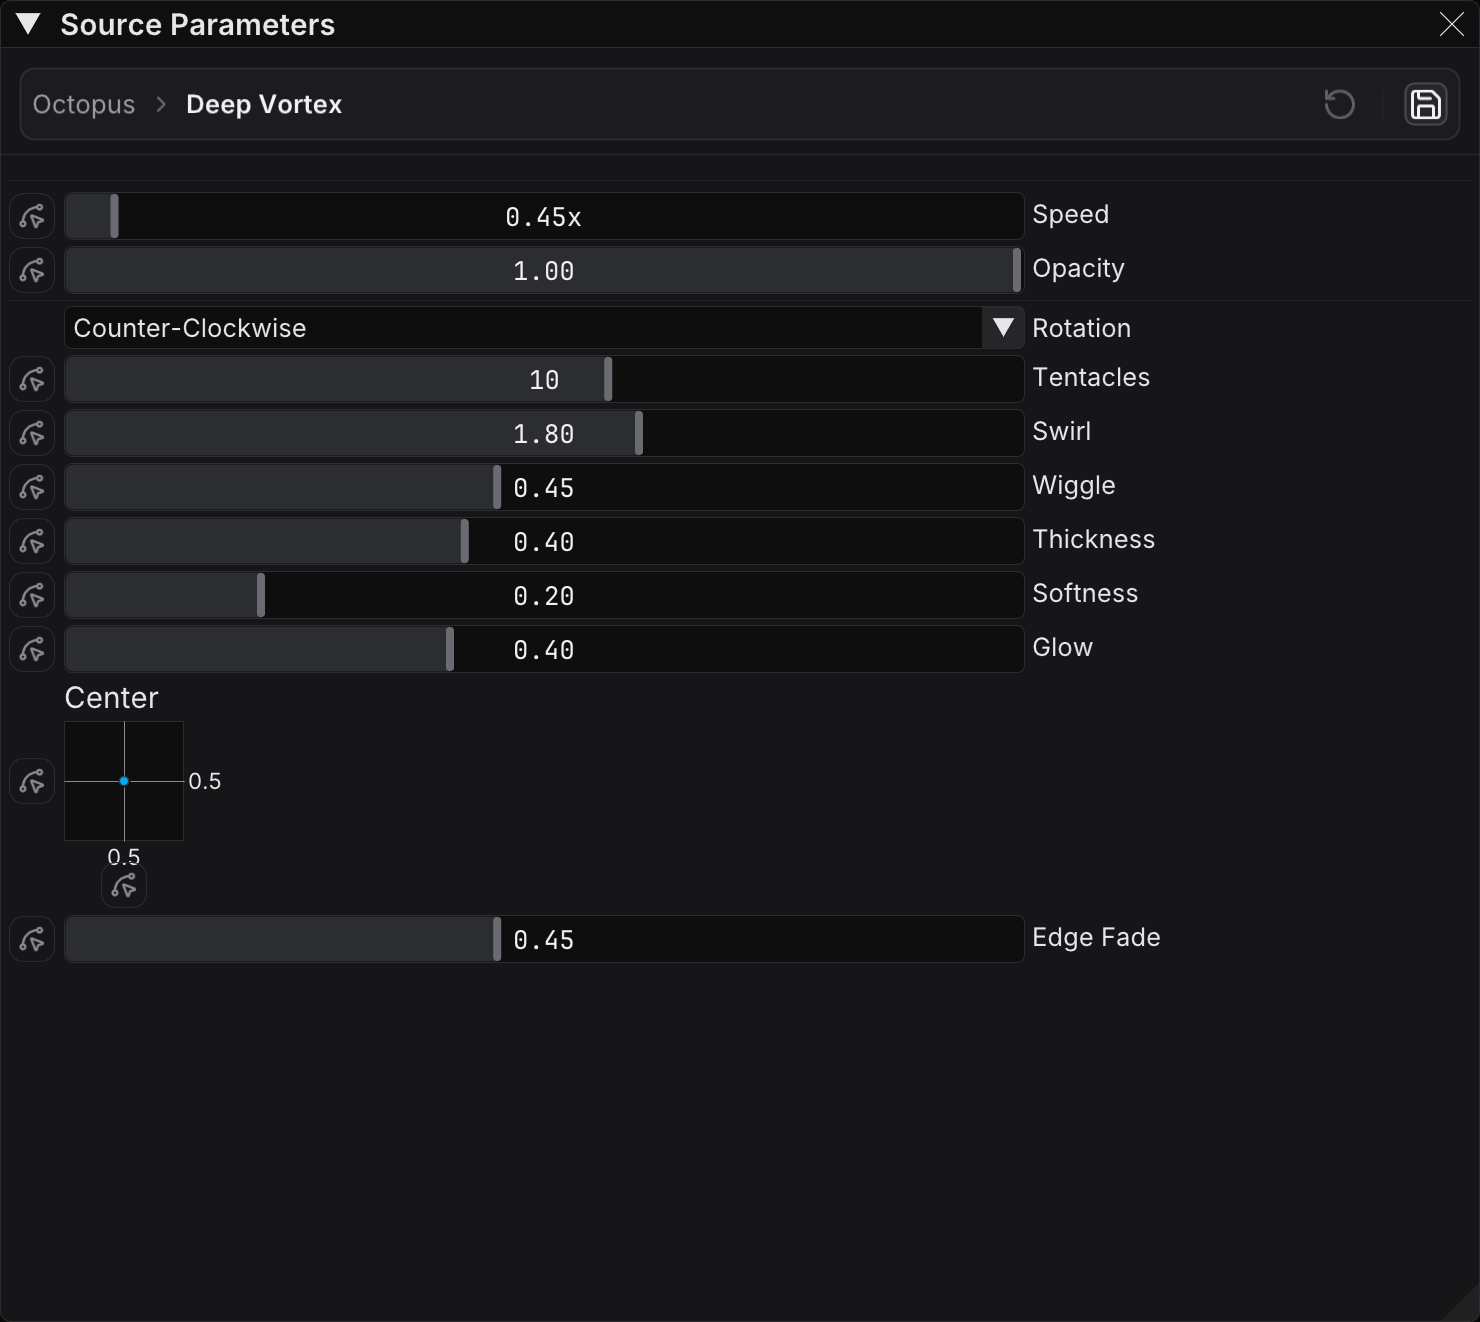
The Source Parameters panel shows the controls for the active source.
Breadcrumb and Save Controls
The action bar at the top of the panel holds the context and the save controls:
| Control | Description |
|---|---|
| Breadcrumb | The source type, a chevron, and the preset name. A source with no preset reads "Not Saved" |
| Revert to Saved (rotate-left icon) | Discards your changes and restores the saved preset values |
| Save (floppy disk icon) | Opens the save menu |
When a preset has unsaved changes, the preset name in the breadcrumb is orange text with an asterisk (*) at the end. The panel tab also shows an orange overline for unsaved content.
Common Parameters
Each source has its own parameters. Many sources share these two:
| Parameter | Description |
|---|---|
| Speed | This controls how fast the pattern animates. Higher values give more energetic movement. |
| Softness | This controls edge hardness. Low values give sharp edges. High values give smooth transitions. |
The other parameters change with the source type. Select a source to see its own parameters in the panel.
BPM Sync for Parameters
You can sync any numeric parameter to the beat:
- Click the modulation button in the gutter to the left of the parameter
- Select BPM in the mode row of the popover
- The parameter then moves between the two range handles in time with the beat
Right-click a parameter to reset it to its default value instead. For the full modulation model, see Modulation.
Speed works well when it syncs to the beat. Patterns then surge and relax with the music.
Saving Changes
The save button (floppy disk icon) in the action bar opens a menu with two rows:
| Row | Description |
|---|---|
| Save | Updates the current preset with your changes. It is available for user presets with changes only |
| Save As... | Makes a new preset with a custom name |
Revert to Saved is a button of its own beside the save button, and not a row in this menu. When a loaded preset has changes, that button becomes available.
FXCanvas cannot overwrite built-in presets. Use Save As to make your own version.
Available Sources
FXCanvas ships with 30 built-in sources. Many of them are beat-reactive. When BPM sync is active, these sources retrigger on a musical interval that you set. An editable envelope shapes each retrigger. The beat-reactive sources (Bounce, Bricks, Chase, Explosion, Flash, Ripple Pop, Shape Expand, Shockwave, Sweep) share one set of beat controls. The controls are an "Every" retrigger period, an envelope, phase, and a Color Map.
For those shared controls, the full parameters, and preview videos, see the Sources Reference.
Three sources — Curvature, Swarm, and Oncoming — run on Windows only. They render too slowly under the OpenGL implementation of Apple for live use. For this reason they do not appear on macOS. See FXCanvas on macOS.
| Source | Description |
|---|---|
| Bars | Horizontal, vertical, or diagonal bars that scroll across the canvas |
| Blobs | Raymarched 3D metaballs with glass-like refraction |
| Bounce | A ball that strikes the floor on the beat, with squash and an impact flash |
| Bricks | Brick grid where bricks strike on the beat (cell flash, row/column chase, or wall wash) |
| Chase | A console-style chase where one segment lights per beat and marches along the strip |
| Clouds | Soft fractal cloud cover that drifts, for slow ambient sky washes |
| Curvature | A 3D parametric curve drawn as bright line segments. The color follows how tightly the curve bends (Windows only) |
| Data Patterns | Rows of lit cells that stream past in ragged runs, with an optional polar wrap into rings that rotate |
| Drift | Slow organic color regions that drift like ink in water |
| Explosion | Bursts that trigger on the beat at random locations |
| Fire | Fire from a single contained flame to a full-frame turbulent wall. Heat maps onto the palette |
| Flash | A full-frame pop of palette color on the beat — the distilled lighting hit |
| Flow | Smooth organic gradients that flow and use the full palette |
| Gradient | One straight palette ramp that travels across the rig, the simplest wash |
| Lighthouse | A lamp that throws one, two, or four wedges of light. The wedges rotate together |
| Octopus | Arms that undulate and coil out of a core that breathes |
| Oncoming | Bright bars, discs, or hexagons that rise out of a horizon and sweep past the viewer in perspective (Windows only) |
| Plasma | Coherent waves that interfere into a regular standing lattice |
| Pulse | Radial color rings that pulse out from a center point that you set |
| Rain | Streaks of palette color that fall continuously in any direction |
| Ripple Pop | Ripple waves that trigger on the beat and collide |
| Shape Expand | A shape that expands and hits on the beat (outline, or filled with wobble) |
| Shockwave | A radial luminance wave that hits on the beat and races outward |
| Sphere Cavern | A flight through an infinite cavern of repeated spheres with fog |
| Spiral | A full-frame color swirl that coils out from a center point |
| Swarm | Soft particles spread across the frame. Each particle wanders around its home point (Windows only) |
| Sweep | A soft bar that sweeps across the frame on the beat, at any angle |
| Voronoi | A cellular tiling of sites that wander, from flat tiles to domed stones to an unlit web |
| Warp Speed | A hyperspace tunnel with stars that streak past |
| Wave | A sea surface that travels, with sharpened crests and slope shading |
Working with Source Presets
Creating Custom Presets
To save the current source settings:
- Adjust the source parameters until you like the look
- Click the save button (floppy disk icon) in the Source Parameters action bar
- Select Save As...
- Enter a name for your preset
- Click Save
Your preset appears in the Source Presets panel, under My Presets.
Managing Presets
Right-click any preset to open the context menu:
| Action | Description |
|---|---|
| Load | Apply this preset to the current source |
| Rename | Change the preset name (user presets only) |
| Delete | Delete the preset (user presets only) |
FXCanvas cannot rename or delete built-in presets.
Preset Storage Locations
FXCanvas stores presets in two locations:
- Built-in presets — These ship with the application and are read-only
- User presets — FXCanvas stores these in your user profile, and they are available in all shows
Cues store a full snapshot of the source and its parameters. A show therefore does not depend on the presets in your library to play correctly.
Tips and Best Practices
Choosing Sources for Different Scenarios
Ambient / Background
- Use calm sources (Drift, Flow, Gradient, Plasma, Pulse) for a relaxed atmosphere
- Low speed values give peaceful, meditative moods
- Enable BPM sync with wide ranges for a subtle musical response
High Energy / Drops
- Use punchy, rhythmic sources (Bars, Sweep, Chase, Flash, Spiral) for high-energy looks
- Higher speeds and lower softness values increase the intensity
- BPM sync with tight ranges gives strong beat-locked movement
Performance Considerations
Sources run on the GPU and use few resources. If a complex show runs slowly, reduce the number of stacked effects. A simpler source gives less benefit.
ISF Sources
FXCanvas can load ISF (Interactive Shader Format) shaders as sources. ISF is an open standard for GPU-accelerated visual generators. Large community libraries of free ISF shaders are available online.
Importing from the web Pro
The fastest way to add ISF shaders is to paste a link from one of the two supported community libraries:
- editor.isf.video — the ISF Editor library
- glslop.com — a CC0 (public domain) shader commons
The steps are the same for both sites:
- Find a shader that you like on one of the two sites
- Copy the URL from your browser
- In FXCanvas, open File → Import ISF Shader...
- Paste the URL. Then click Import

The add button (plus icon) in the Effect Presets panel opens the same dialog, under Import ISF shader.... There is one importer, and both entry points reach it.
FXCanvas downloads the shader and classifies it as a Source or an Effect. It then saves the shader in the correct folder. After the import, click Refresh in the presets panel to see it.
Accepted URLs
| URL | Imports |
|---|---|
https://editor.isf.video/shaders/{id} | One shader |
https://editor.isf.video/u/{username} | Every shader on that profile |
https://glslop.com/shader/{id} | One shader |
https://glslop.com/?tag={tag} | Every shader with that tag |
https://glslop.com/?q={search} | Every shader that matches that search |
https://glslop.com/?sort=slop | The current top of that listing |
Bulk imports
An isf.video profile URL imports every shader on it. A glslop tag page, search page, or sort page does the same. A summary reports how many shaders FXCanvas found, imported, and skipped, and how many failed. One failure does not stop the other shaders.
A glslop bulk import downloads up to 50 shaders per run. To raise the limit, use ?limit=, which caps at 100. The import fetches each shader separately, so it can take a minute. FXCanvas skips shaders that are already in your library by id. You can therefore run the same tag again later to add new shaders without duplicates.
Attribution
Every imported shader keeps a link to its author. The Source Parameters panel shows this link as Created by. An isf.video username links to editor.isf.video/u/{username}. A glslop handle links to glslop.com/u/{handle}.
The glslop read API gives only an internal account id, so FXCanvas reads the handle from the page of the shader. If that lookup fails, the import still succeeds. FXCanvas then shows glslop and links to the shader instead of the author.
Some glslop authors declare the AI model that generated a shader. FXCanvas records that model with the import, but does not show it as the author. The model generated the shader, but a person posted it.
File → Import ISF Shader... is gray in the free tier. Import ISF shader... in the Effect Presets add menu is gray as well, and the row carries a padlock. You can add ISF files by hand in both tiers, as described below. Shaders that you import with a license still work afterwards. For the full list, see What requires a license.
Adding ISF Sources Manually
To add an ISF source by hand:
- Put the
.fsor.isffile in your Sources folder - Click Refresh in the Source Presets panel
- The ISF source appears in the list, ready for use
ISF sources work in the same way as built-in sources. They support BPM sync, audio reactivity, and presets.
Palette Integration
FXCanvas connects ISF sources to the palette system automatically, and it reaches every shader.
At load time FXCanvas looks for a color generation function such as getFragColor, getColor, or palette, and replaces it with a palette-aware version. A shader that computes its colors inline gives that search nothing to find, so FXCanvas remaps the final color at the end of main() instead. The result is the same either way:
- An ISF source with hardcoded colors uses your active palette instead
- A palette change immediately changes the colors of ISF sources
- Palette transitions work smoothly with ISF sources
This replacement is internal, and FXCanvas never changes the original ISF file.
Each ISF source also carries a Use Palette toggle in the Source Parameters panel. Clear it to see the shader in the colors of its author.
A multi-pass ISF shader gets no final-color remap. Its intermediate passes carry data, for example a feedback buffer or a blur tap, and a remap there corrupts the chain. Such a shader follows the palette only when it holds a color function that FXCanvas recognizes.
ISF Parameters
ISF shaders declare their own parameters, such as sliders, toggles, and color pickers. These parameters appear in the Source Parameters panel with the built-in source parameters. FXCanvas supports all ISF parameter types:
| ISF Type | FXCanvas Control |
|---|---|
| Float | Slider with a min/max range |
| Bool | Toggle checkbox |
| Long (with labels) | Dropdown menu |
| Long (without labels) | Integer slider |
| Color | Color picker |
| Point2D | Two sliders (X and Y) |
Related Topics
- Video Inputs — Use external video feeds (webcams, NDI, Spout/Syphon, DeckLink) as sources
- Video Playback — Play video and image files from your drive
- Sources Reference — The full parameter reference for every source type
- BPM Sync — Sync source parameters to the beat
- Getting Started — An overview of the FXCanvas basics