Modulation
Modulation turns a static look into a performance. Instead of a fixed number, you give a parameter to a driver. The driver is a free-running timeline, the beat clock, or the audio that arrives at the machine. The parameter then moves on its own, on a curve that you draw, inside a range that you select.
Every numeric parameter on a source or an effect carries its own modulation. One value can breathe slowly on a timeline while another value snaps on every kick.
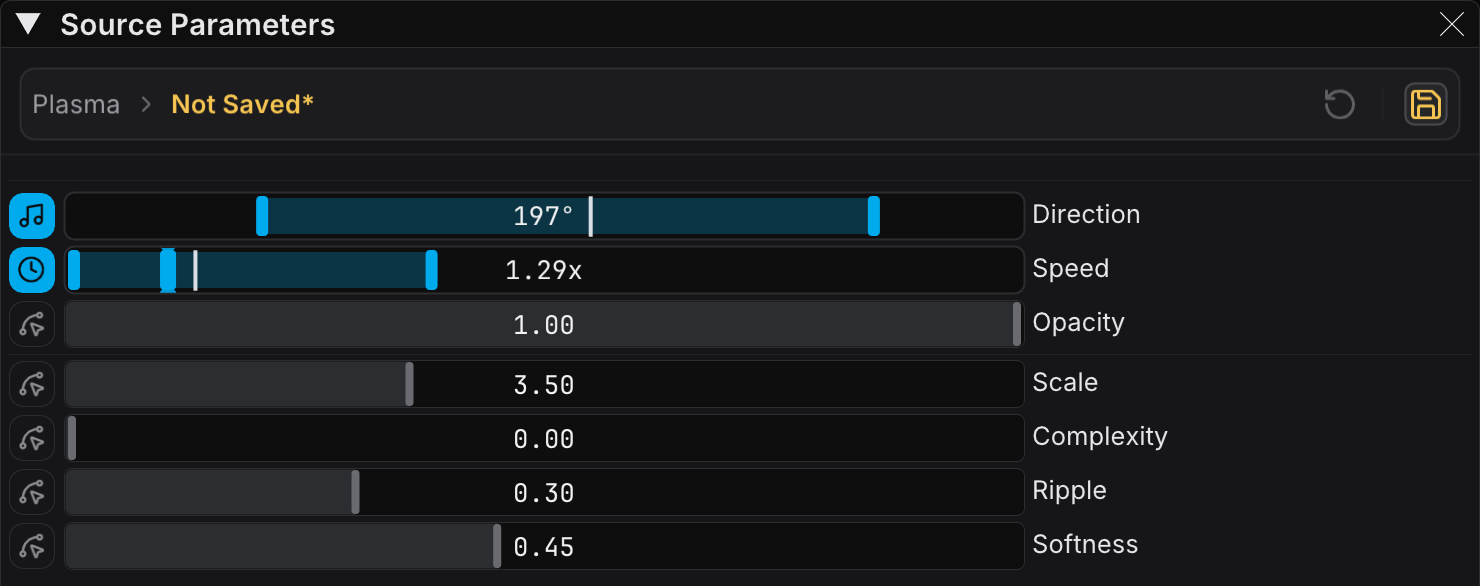
What Modulation Does
A modulation has one job. It produces a value between 0 and 1 every frame. It then maps that value onto the parameter that it owns.
The mode decides where the 0 to 1 value comes from:
| Mode | Driver | Use it for |
|---|---|---|
| Off | Nothing. The parameter holds the value that you set. | Anything that you want to keep still |
| Timeline | A free-running clock measured in seconds | Slow drift, breathing, and anything that does not follow the music |
| BPM | The global beat clock, measured in bars | Anything that must land with the track |
| Audio | A frequency band from the audio input | Energy-driven movement that follows the room |
Timeline and BPM read a curve that you draw. They then repeat that curve again and again. Audio has no curve. It follows the level of the band that you select, with smoothing on the way up and on the way down.
Modulation is available on numeric parameters (sliders and integer fields). It is also available on each axis of a position pad separately. Color parameters and dropdown parameters have no modulation.
The Modulation Button
Every numeric parameter row keeps a slot at its left edge for the modulation button. The slot is always there, so the rows stay aligned with modulation and without it.
| State | Appearance | Tooltip |
|---|---|---|
| Off | Outlined square with a dim waveform glyph | Add modulation |
| Active | Filled accent square with a glyph for the current mode | Modulation active, click to edit |
Click the button to open the modulation popover next to the row. The popover is not modal. Click outside it to close it, and the parameter keeps the values that you set.
The mode row at the top of the popover arms and disarms the modulation. Off stops the modulation but keeps its settings. You can enable it again later without a new curve.
Modulated Parameter Rows
After a parameter starts to modulate, its row no longer looks like a plain slider. The row then shows what happens to the value.
- The band across the track shows the span that the value can travel
- A bright tick rides inside the band at the current value of the parameter
- The number in the center of the track is the live output, not the value that you typed
In Relative range mode you can still drag the base handle in the row. You can therefore move the center of the movement without the popover. In Absolute mode the modulation owns the value, and the manual handle disappears.
Range: Relative or Absolute
Range is the bridge between the driver and the parameter. All three modes share it. The Rel and Abs chips sit under the range band in the popover.
| Range mode | Behavior |
|---|---|
| Rel (Relative) | The band rides the value that you set by hand. Depth sets how far the value can swing to each side, symmetrically. When you move the base, the whole band moves with it. |
| Abs (Absolute) | The band is fixed between a minimum handle and a maximum handle. The modulation sweeps the full span, whatever value the parameter had. |
Relative is the safer default. Set a value that you like. Then add a little movement around it. When the movement is the point, use Absolute. An example is a strobe that must reach full brightness and full black in every cycle.
The first time you set a parameter to Audio, FXCanvas selects Absolute automatically. An audio follower normally owns its parameter. It does not add a small movement to a value that you set. To make the band ride a value that you set, change the mode back to Rel.
Drag either edge handle to reshape the band. During the drag, the value in real units appears over the handle. You therefore set a brightness or a speed, not an abstract percentage.
Timeline Mode
Timeline runs on its own clock and ignores the music. Set a cycle length in seconds. The curve then repeats at that rate.
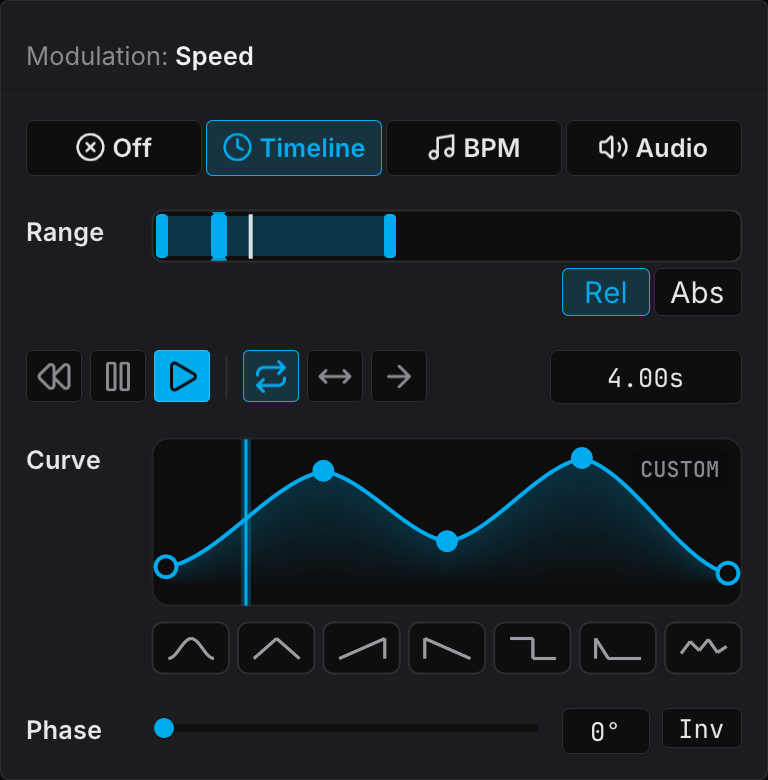
Transport controls sit directly under the range band:
| Control | What it does |
|---|---|
| Reverse | This flips the play direction. It stays highlighted during backwards playback. |
| Pause | This freezes the playhead where it is. The parameter holds that value. |
| Play | This continues forwards playback. It is the one solid accent button in the popover. |
| Loop | This repeats the curve from the start in every cycle |
| Ping-pong | This plays the curve forwards, then backwards, then forwards |
| Once | This plays the curve one time from the moment you click Play, then holds the end value |
| Length | The cycle length in seconds. Drag it from a twentieth of a second to ten minutes. |
Once is available in Timeline mode only. Press Play again to arm it and fire it again. It therefore works as a one-shot for a build or a reveal.
BPM Mode
BPM mode is the same machinery, locked to the global beat clock. A curve that takes two bars takes two bars at any tempo.
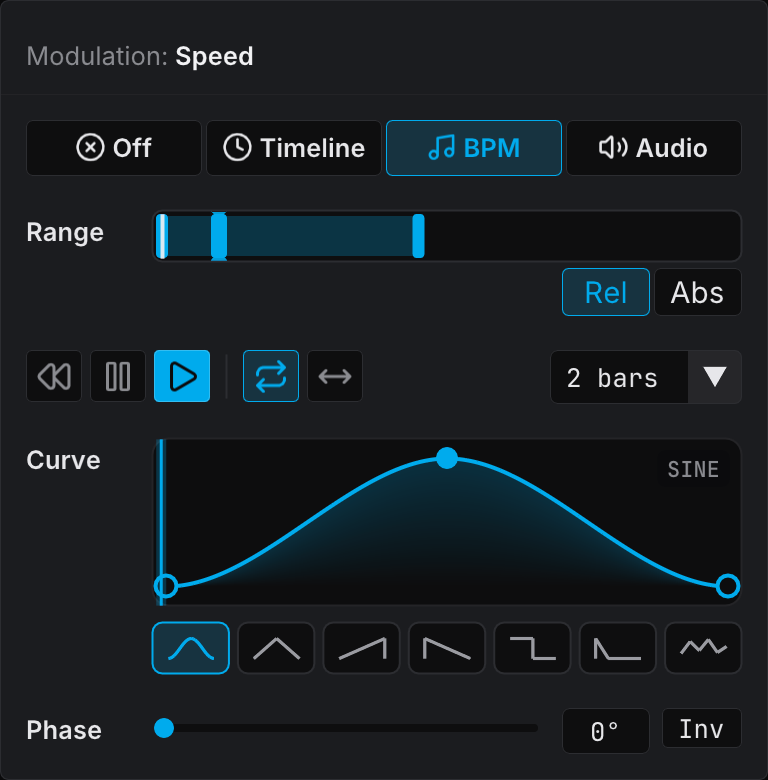
The length control is the one real difference from Timeline. Instead of seconds you select a musical division, from a quarter bar to eight bars. Once disappears, because a beat-locked one-shot is a cue, not a modulation.
FXCanvas anchors the cycle to the beat clock, not to wall time. Every modulation in BPM mode therefore stays in phase with the others. Two parameters with the same one-bar length always cross their cycle boundary together.
RESYNC in the Tempo section sets where beat one is. Every BPM modulation restarts its cycle at that moment. This is the fastest way to realign a show that drifts after a track change.
The Speed knob in Source Globals scales the cycle length of the beat-locked movement of a source. At the default speed of 1.0, the cycle sits exactly on the global beat grid. A speed change during a show stretches the cycle from that moment. The playhead does not jump.
Audio Mode
Audio mode replaces the curve with a follower. Select a frequency band. The parameter then tracks the current level of that band.
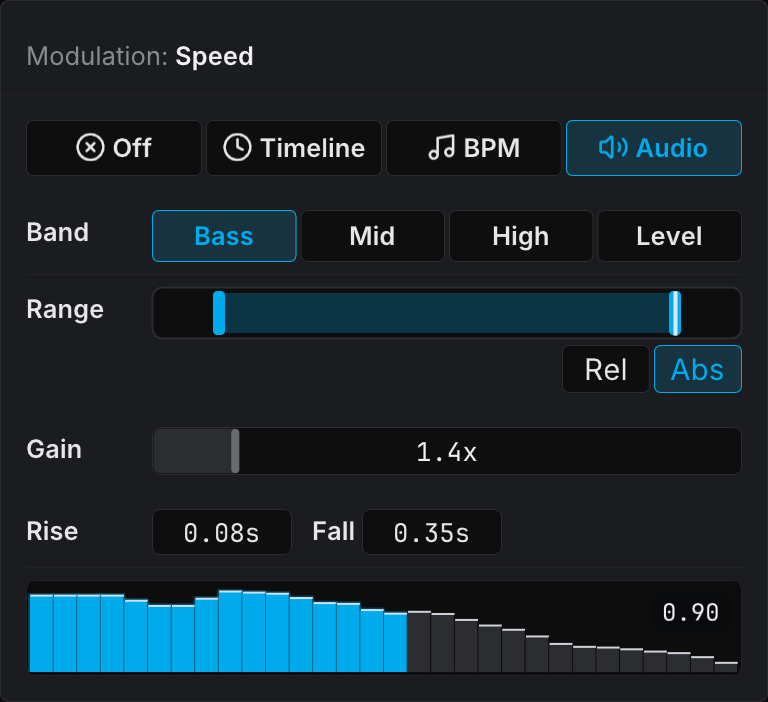
| Control | Range | What it does |
|---|---|---|
| Band | Bass, Mid, High, Level | Which part of the spectrum to follow |
| Range | Rel or Abs | Where the 0 to 1 output of the follower lands on the parameter |
| Gain | 0.1x to 10x | This multiplies the band level before the clamp. Raise it for quiet material. |
| Rise | 0.01s to 5s | How fast the follower climbs toward a louder signal |
| Fall | 0.01s to 5s | How fast the follower falls after the signal drops |
The spectrum preview at the bottom is live. The bins inside the selected band are accent-colored, and the other bins are dim. A white line rides each bar at its current follower value. The number in the corner is the output of the modulation. It is the fastest way to see whether the parameter moves.
A short Rise with a longer Fall is the classic shape. The parameter snaps on the transient, then decays. It does not chatter with every sample.
You must connect Audio Input. Without it, Audio mode does nothing. For device selection and loopback capture, see Audio Input.
The Curve Editor
Timeline and BPM both replay an editable curve. The canvas asks the engine to sample the curve and then draws it. The image is therefore exactly what the parameter does.
Preset shapes sit in the chip row below the canvas. They are Sine, Triangle, Saw, Ramp, Square, Pulse, and Random. Click one to seed the curve. Random makes new values at every click. It is a fast way to find a shape that you do not draw by hand.
Direct edits to the curve:
| Action | Result |
|---|---|
| Drag a point | This moves the point. FXCanvas clamps interior points between their neighbors. The two endpoints move vertically only. |
| Double-click empty canvas | This adds a point at that position |
| Right-click an interior point | This removes the point |
Any edit changes the badge in the corner of the canvas from the preset name to CUSTOM. New points arrive with a gentle ease-in-out. A hand-built curve therefore flows and has no hard kinks.
An accent playhead sweeps the canvas at the current cycle position. You can therefore see where the parameter is in the curve at any moment.
Phase and Invert
The Phase row sits at the bottom of the popover.
- The slider offsets where the curve starts in the cycle, in degrees from 0 to 360. Drag it right to make the movement land later.
- Inv flips the curve vertically. A ramp that rises becomes a ramp that falls, with no redraw.
Use Phase to stagger several parameters that share a length. Give three parameters the same one-bar Sine. Then offset two of them by 90 degrees and 180 degrees. The three parameters then chase each other. They do not pulse together.
The Source Animation Strip
Beat-driven sources have the movement inside the shader, not on one parameter. These sources show an Animation card with an accent border. The card sits at the top of the Source Parameters panel, over the parameter rows.
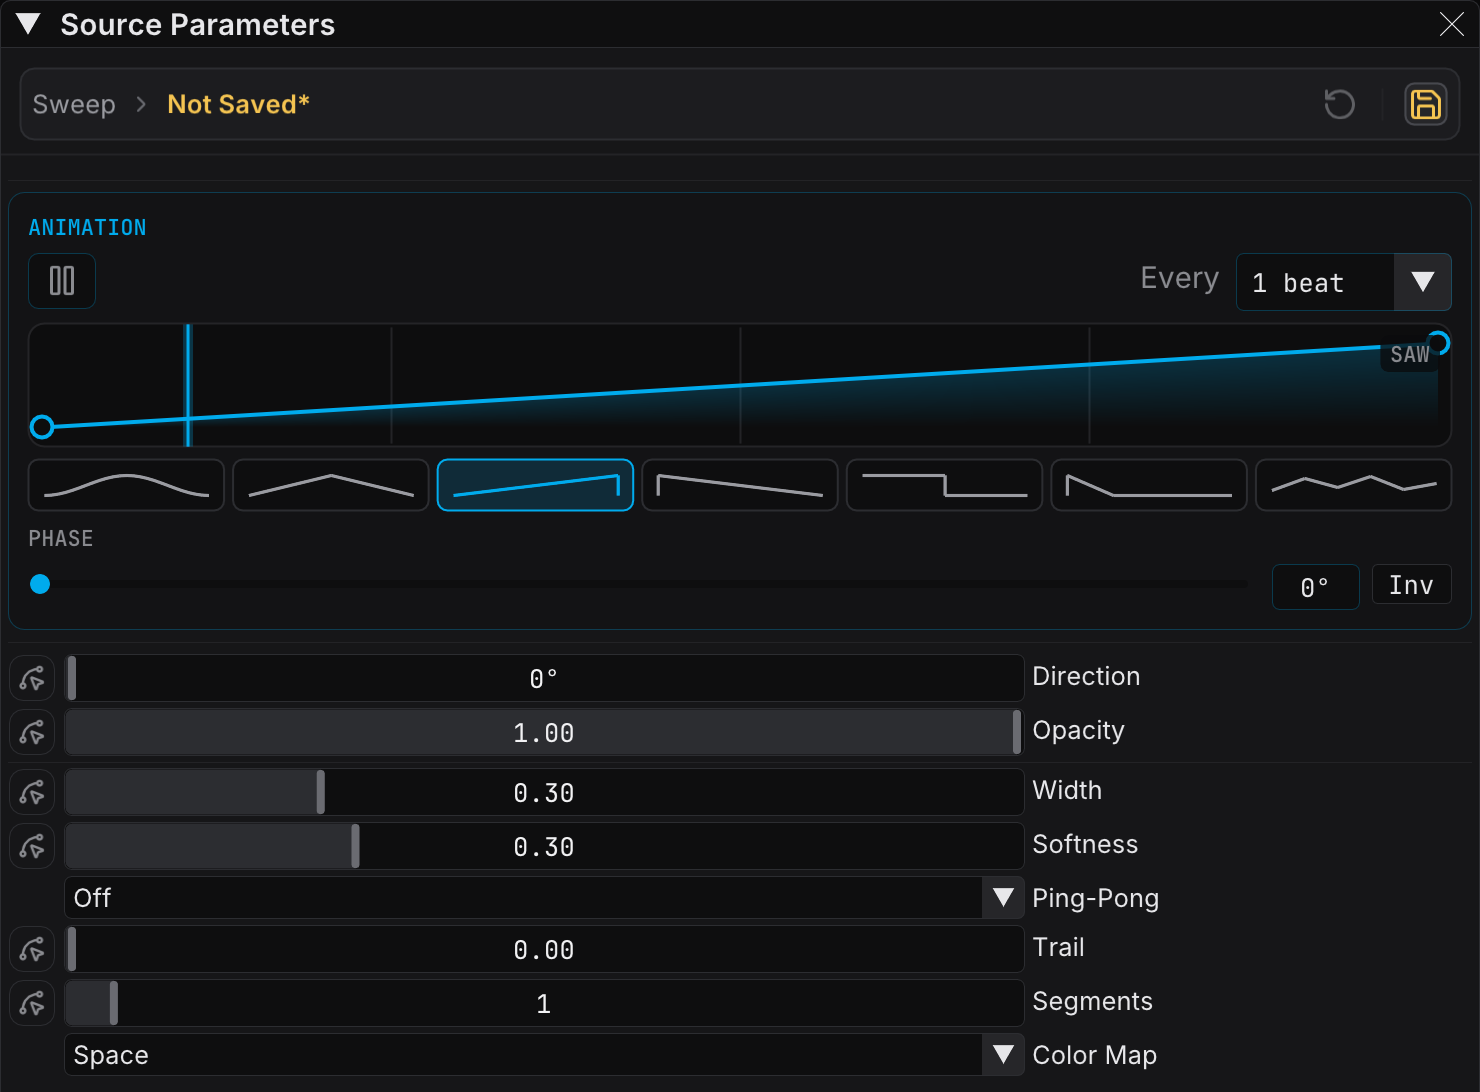
The card carries the same controls as the popover, arranged for the job:
- A play/pause button for the animation of the source
- An Every selector that sets the retrigger window, from a quarter beat to four bars
- The curve editor, with a beat grid behind it. The drag labels are in beats, not fractions, so you can put a hit on beat three instead of 0.67
- A phase row with the same slider and Inv chip
This one curve drives the whole beat response of the source. An edit therefore changes the character of every hit, not the behavior of one knob. Sources that are not beat-driven do not show the card.
Saving and Recalling
Modulation travels with the item that owns it.
- Source and effect presets store the modulation on each parameter, with its curve, range, transport, and audio settings. FXCanvas stores a parameter that is Off as a plain value, so presets stay clean.
- Applying a preset brings its modulation with it. The transport starts from a known state. It does not inherit the mid-cycle state of the previous preset.
- Shows and cues capture the full state. A cue recall therefore restores the movement and the values.
FXCanvas saves the Animation curve of a beat-driven source with its parameters. An edit marks the preset as modified, and FXCanvas highlights Save.
Tips and Best Practices
Use Rel first. You can find a value by hand and then add movement around it, which keeps the look that you designed. When the movement itself is the effect, change to Abs.
Modulation on everything at once reads as noise. Select the one parameter that carries the idea. Give it a clear curve. Leave the rest still. One pulse in the right place reads better from the floor than six values that wobble.
A one-bar cycle reads as rhythm. A four-bar or eight-bar cycle reads as structure, and it gives a section a sense of build. Use short cycles for the parts that hit and long cycles for the parts that set the mood.
Loop restarts the curve immediately at the cycle boundary. If your curve does not end where it starts, you see a snap. Ping-pong plays the curve in reverse, which is always continuous.
Troubleshooting
The parameter is not moving
- Make sure that the mode is not Off. When the mode is Off, the modulation button is outlined instead of filled.
- Make sure that the transport plays. A paused modulation holds its value and looks like a static parameter.
- In Relative mode with a small depth, the movement can be real but too small to see. Widen the band.
The parameter is pinned at one end
- In Relative mode, FXCanvas clamps the output to the limits of the parameter. If the base value sits near the top of its range, the upper half of the band cannot move. Move the base value toward the middle.
Audio mode does nothing
- Make sure that Audio Input is connected in Edit → Settings → Audio Input
- Watch the spectrum preview in the popover. A flat preview means that the capture failed, not the modulation.
- Raise Gain for quiet material, or select another band. A track with no sub content does not drive a Bass follower.
BPM movement drifts against the music
- Make sure that the tempo source is locked, not free-running. See BPM Sync.
- Click RESYNC at the top of a phrase to re-anchor every beat-locked cycle at once.
- Read the Source Globals Speed knob. Any value other than 1.0 rescales the cycle and moves it off the global grid.
The curve badge says CUSTOM and I wanted the preset back
Click the preset chip again. It builds the curve again and discards your edits. If you want to keep the edits, save the preset first.
Related Topics
- Sources: the parameters that gain most from modulation
- Effects: effect parameters carry modulation too
- BPM Sync: the beat clock that BPM mode locks to
- Audio Input: device setup and spectrum analysis for Audio mode
- Palettes: color movement, which runs on its own transition system
- Shows and Cues: how a cue captures the modulation state