Audio Input
Make your visuals react to music in real time. FXCanvas captures audio from microphones or system audio (loopback), performs spectrum analysis, and feeds frequency data into your effects — creating visuals that pulse, shift, and flow with the music.
What is Audio Input?
Audio Input captures sound from your system and analyzes it in real time using FFT (Fast Fourier Transform) to extract frequency band data. This data is then available to drive visual parameters — making effects respond to bass hits, vocal frequencies, or overall energy levels.
Key capabilities:
- Microphone capture — Use any connected microphone or audio interface
- System loopback — Capture whatever audio is playing on your computer (no cables needed)
- 64-band spectrum analysis — Detailed frequency breakdown from sub-bass to high frequencies
- Aggregate levels — Pre-computed Bass, Mid, High, and Overall levels for easy mapping
- BPM detection — Automatic tempo detection from audio for beat-synced effects
- Audio-reactive parameter mapping — Drive any source parameter from audio data
Getting Started
Opening Audio Settings
- Open Edit → Settings from the menu bar
- Select the Audio Input tab in the sidebar
Selecting a Device
The device dropdown shows all available audio inputs on your system:
| Device Type | Description |
|---|---|
| Microphones | USB mics, built-in mics, audio interface inputs |
| Loopback devices | System audio capture (what you hear through speakers) |
Loopback is the easiest way to make visuals react to music — it captures whatever audio is playing on your computer without any cables or routing. It's sometimes called "what you hear" capture because it records the exact signal going to your speakers or headphones.
Using the Loopback Feature ("What You Hear")
Loopback captures the audio your system is already playing — music from Spotify, a DJ app, a browser, anything with sound. No virtual audio cables or hardware loopback required.
On Windows
Every playback (render) device on Windows automatically gets a matching loopback capture. FXCanvas enumerates these alongside regular microphones:
- Play some audio through your normal speakers or headphones
- Open Edit → Settings → Audio Input
- In the device dropdown, look for entries with (Loopback) appended to the name — typically your default speakers or headphones
- Select the loopback device that matches the output you're listening through
- The spectrum preview should immediately start reacting to the audio
Loopback is per-output. If your music is playing through headphones but you pick the loopback for your speakers, you'll get silence. Pick the loopback device that matches whatever output is actually producing sound right now.
Loopback on Windows is built into the operating system, so no extra drivers or virtual cables are needed. Audio continues to play normally through your speakers while FXCanvas captures it.
On macOS
macOS doesn't expose system output as a capture source by default — you need a virtual audio device to route output back as input. FXCanvas automatically detects and marks these as loopback devices when installed:
| Virtual Device | Notes |
|---|---|
| BlackHole | Free, open source. The most common choice. Install from existential.audio/blackhole |
| Soundflower | Older, less maintained. Use BlackHole instead on modern macOS |
| Generic "Loopback" device | Loopback.app from Rogue Amoeba (paid) |
Typical BlackHole setup:
- Install BlackHole (2ch is sufficient for most cases)
- Open Audio MIDI Setup (in
/Applications/Utilities/) - Create a Multi-Output Device that includes both your speakers/headphones and BlackHole — this lets you hear audio normally while also routing it to BlackHole
- Set that Multi-Output Device as your system output in System Settings → Sound
- In FXCanvas, select BlackHole 2ch (Loopback) as the audio input device
The spectrum will now react to anything your system plays, and you'll still hear it through your regular output.
If you only want a specific app's audio to reach FXCanvas (for example, a DJ app without system sounds), route just that app's output to BlackHole directly. Most DJ and music apps let you pick an output device independently of the system setting.
Adjusting Settings
Once a device is selected, configure the analysis:
| Setting | Range | Default | Description |
|---|---|---|---|
| Sensitivity | 0.1 – 10.0 | 1.0 | Gain multiplier for the spectrum. Increase for quiet sources, decrease for loud ones. |
| Smoothing | 0.0 – 1.0 | 0.3 | How much to smooth the spectrum over time. Higher values create more stable but less responsive visuals. |
Monitoring the Spectrum
The settings tab shows a real-time spectrum visualization:
- Spectrum bars — 64 frequency bands displayed as vertical bars
- Level meters — Aggregate Bass, Mid, High, and Overall levels
- Connection status — Shows whether audio is being received
Connection Status
A status indicator shows the current state of audio capture:
| Status | Color | Meaning |
|---|---|---|
| Connected | Green | Receiving and analyzing audio data |
| Connecting | Yellow | Attempting to connect to the selected device |
| Disconnected | Gray | No device selected or audio input disabled |
| Error | Red | Device unavailable or capture failed |
Using Audio-Reactive Effects
Audio data drives visuals through the parameter mapping system in ISF sources and built-in sources.
Audio-Reactive Parameter Mapping
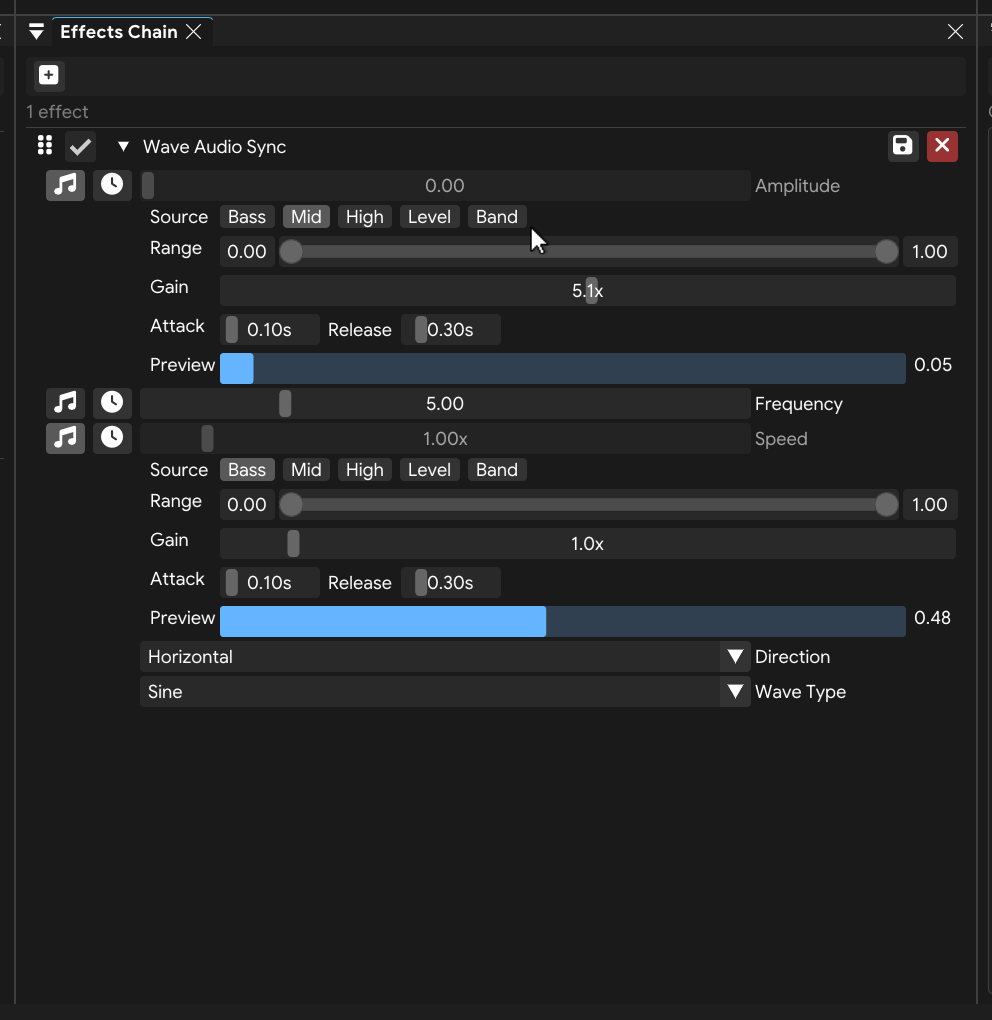
Any numeric parameter on a source can be mapped to audio:
- Open the Source Parameters panel
- Right-click a parameter (e.g., Speed, Intensity)
- Select Audio Reactive as the mapping target
- Choose an audio source:
| Source | Description | Best For |
|---|---|---|
| Bass | Low frequencies (20–2750 Hz) | Kick drums, bass drops, heavy beats |
| Mid | Mid frequencies (2750–13800 Hz) | Vocals, guitars, synths |
| High | High frequencies (13800–22050 Hz) | Hi-hats, cymbals, sparkle |
| Level | Overall audio energy | General reactivity to any sound |
- Adjust the Gain to control how strongly audio affects the parameter
How It Works
When a parameter is mapped to audio:
- The parameter value oscillates between its min and max range
- The audio level (0–1) determines where in that range the value sits
- Bass = 1.0 means the parameter is at maximum; Bass = 0.0 means minimum
- Smoothing prevents jittery movement from transient audio spikes
Example Setups
Bass-Reactive Pulse:
- Source: Pulse
- Map Speed → Audio Reactive (Bass)
- Result: Pulse rings expand faster on kick drums
Mid-Reactive Color Shift:
- Source: Any palette-based source
- Map Softness → Audio Reactive (Mid)
- Result: Colors sharpen and soften with vocal/melodic content
Overall Energy Intensity:
- Source: Plasma
- Map Speed → Audio Reactive (Level)
- Result: Pattern movement increases with overall audio energy
BPM Detection
Audio Input includes automatic BPM detection that can feed into the BPM Sync system.
When BPM is detected from audio, it can be used as a tempo source alongside Internal, Ableton Link, and Pioneer DJ.
Enabling BPM Detection
BPM detection is available when audio input is connected. The detected tempo appears in the BPM Sync panel when audio is the active tempo source.
Audio-based BPM detection works best with music that has a clear, consistent beat. Complex or ambient music may produce unreliable results. For critical timing, consider using Ableton Link or MIDI Clock instead.
Troubleshooting
No Devices Shown
- macOS: Grant microphone permission in System Settings → Privacy & Security → Microphone
- Try clicking the refresh button to re-scan devices
- Verify the device is connected and not in exclusive use by another application
Connected But No Spectrum Activity
- Check that audio is actually playing (try playing music)
- Increase Sensitivity if the source is quiet
- For loopback: ensure your system audio output is not muted
- Verify the correct device is selected (some systems have multiple loopback options)
Spectrum Is Noisy or Jittery
- Increase Smoothing for more stable visuals (try 0.5–0.7)
- Decrease Sensitivity if the signal is too hot (clipping)
- Some background noise is normal with microphone input — loopback is cleaner
Audio-Reactive Parameters Not Responding
- Verify audio input is connected (check status in Settings → Audio Input)
- Ensure the parameter mapping is set to Audio Reactive (not BPM Sync)
- Check that the audio source (Bass/Mid/High/Level) matches your content
- Increase the Gain on the mapping if the response is too subtle
Tips and Best Practices
- Loopback is best for DJ sets, music playback, and any scenario where audio comes from the computer
- Microphone is best for live music, ambient sound installations, or when audio comes from external speakers
- Low smoothing (0.1–0.2): Very responsive, great for percussive music with clear transients
- Medium smoothing (0.3–0.5): Good balance for most music
- High smoothing (0.6–0.8): Smooth, flowing response — good for ambient or atmospheric effects
Audio reactivity and BPM sync complement each other well:
- Use BPM Sync for rhythmic, beat-locked effects (strobes, color changes on beat)
- Use Audio Reactive for energy-driven effects (intensity, speed, size responding to volume)
- Together they create visuals that are both rhythmically precise and dynamically responsive
Related Topics
- BPM Sync — Tempo synchronization for beat-locked effects
- Sources — Visual patterns that can be driven by audio
- Video Playback — Use audio levels to modulate video playback speed
- Effects — Post-processing effects with audio-reactive parameters
- MIDI Clock — Alternative tempo source from MIDI devices