BPM Sync
BPM Sync keeps your visuals in time with the music. FXCanvas gives you a choice of tempo sources. You can DJ with Pioneer gear, share a tempo with other applications over Ableton Link, or tap the tempo by hand.
The tempo controls are in the Tempo section of the Live panel. The section holds six rows: Source, Tempo, Beat, Speed, Quick, and Status. You select the tempo source from the chips in the Source row. The gear icon in the top-right corner of the section holds the rest. That menu carries Broadcast to Ableton Link, Show Quick Set buttons, and a link to the settings of the active source.
FXCanvas hides a control that cannot act in the active mode, and does not gray it out. An external tempo source therefore removes TAP and the BPM slider from the panel. FXCanvas leaves no dead controls there.
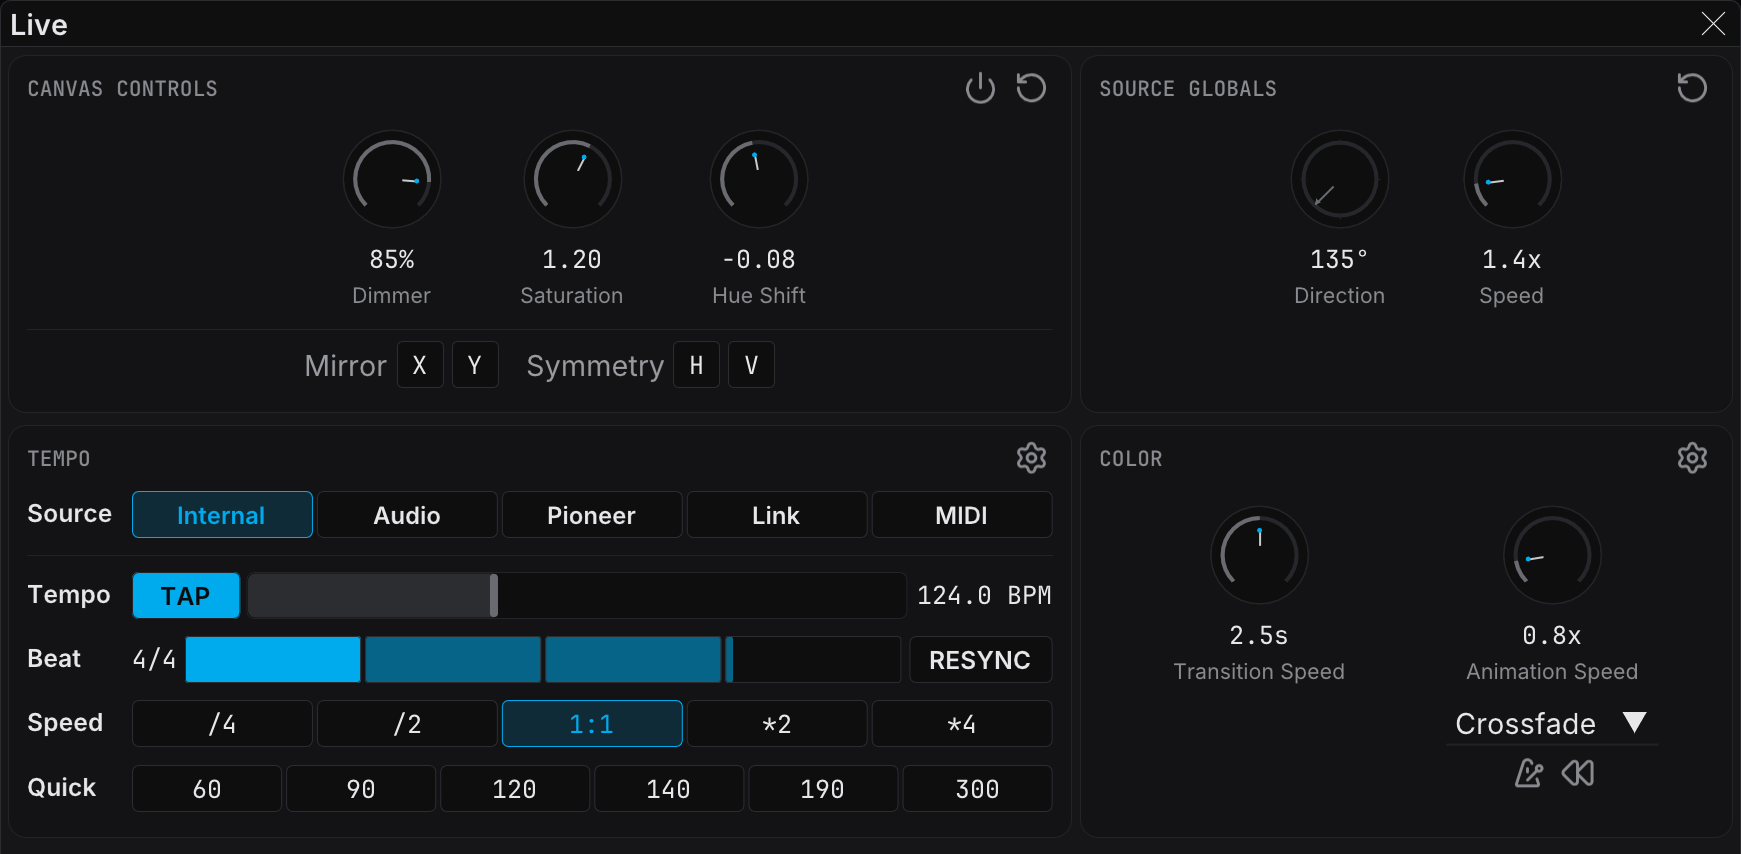
What is BPM Sync?
BPM (beats per minute) synchronization keeps your visual effects in time with the music. With a correct sync, strobes, color changes, and animations land on the beat.
FXCanvas supports five tempo sources:
| Source | Description |
|---|---|
| Internal | Set the BPM by hand, or tap it out |
| Ableton Link | Share a tempo with Ableton Live and other Link applications on your network |
| Pioneer DJ | Sync automatically with CDJs and mixers on the Pioneer DJ Link network |
| MIDI Clock | Follow the MIDI clock from a DAW, a drum machine, or another MIDI device |
| Audio | Detect the tempo from the incoming audio with beat detection |
Choose the Right Setup
This section helps you select a tempo source. Each scenario below gives the setup for one common situation.
Scenario 1: Solo VJ (Standalone Performance)
You want: full control of your visuals, with no connection to other applications or equipment.
Setup:
- Click the Internal chip in the Source row
- Set the tempo with TAP, the BPM slider, or the Quick Set buttons
- Leave Broadcast to Ableton Link unchecked in the gear menu
Best for: solo performances, rehearsals, and pre-recorded music at a known BPM.
Scenario 2: VJ Leading Musicians (You Control the Tempo)
You want: to set the tempo, and other Link applications follow you.
Setup:
- Click the Internal chip in the Source row
- Set the BPM with TAP, the slider, or Quick Set
- Tick Broadcast to Ableton Link in the gear menu
- Accept the warning dialog
Best for: the situation where you lead the tempo, and other visual applications or musicians follow your BPM. Every other Link application syncs to the tempo that you set.
Enable this setting only when you must be the tempo master. Your tempo changes then change the tempo of every other Link peer.
Scenario 3: VJ Following DJ/Musicians (Safe Read-Only Sync)
You want: your visuals follow the tempo of another person, and you never change their session.
Setup:
- Click the Link chip in the Source row
- Leave the ALLOW TEMPO EDITS chip off. This is the default.
- Make sure that your visuals follow the Link session
Best for: live music events where a DJ, a musician, or Ableton Live controls the tempo. This is the safest option with live performers, because you cannot change their tempo by accident.
This setup is best for most live performances. FXCanvas hides TAP, the BPM slider, and the Quick row in this mode, so you cannot affect the musicians by accident. The tempo read-out stays.
Scenario 4: VJ Collaboration (Shared Tempo Control)
You want: to take part in a Link session where several people can change the tempo.
Setup:
- Click the Link chip in the Source row
- Click the ALLOW TEMPO EDITS chip in the Control row
- Accept the warning dialog
- The tempo controls (TAP, slider, Quick Set) appear again
Best for: visual jams with other VJs, and situations where you must adjust the tempo but still follow Link.
Enable this setting only when everybody in the session agrees to shared tempo control. Every tempo change that you make changes the tempo of all connected Link peers.
Quick Reference
| Your Situation | Tempo Source | Settings to Enable |
|---|---|---|
| Solo VJ, no Link | Internal | None |
| You lead, others follow Link | Internal | Broadcast to Ableton Link |
| You follow a DJ or a musician | Ableton Link | None (receive-only) |
| VJ collaboration | Ableton Link | ALLOW TEMPO EDITS |
Tempo Sources
Internal
Internal mode gives you direct control of the tempo. It is the best mode when you have no connection to other DJ equipment or applications.
Key features:
| Control | Description |
|---|---|
| TAP button | Click in time with the music to detect the BPM |
| BPM slider | Drag it to set a tempo between 20 and 300 BPM. Ctrl+click the track to type an exact value |
| Speed buttons | Double or halve the effective speed |
| Quick Set buttons | Jump to a preset BPM value |
Use Internal mode when:
- You know the exact BPM of the music
- You work with pre-recorded content at a fixed tempo
- You want full manual control
Ableton Link Pro
Ableton Link keeps music applications in time over a local network. When you enable Link, FXCanvas joins a Link session and syncs with the other applications in that session.
What you can sync with:
- Ableton Live
- Other Link-enabled music software
- iOS music applications with Link support
- Hardware synths with Link support
How it works:
When you select Ableton Link as your tempo source, FXCanvas joins the Link session. FXCanvas then follows the shared tempo and the beat phase. By default FXCanvas runs in receive-only mode. It follows the tempo changes of the other peers, but it cannot change the tempo. This is the safest option for live performances.
Bidirectional Mode:
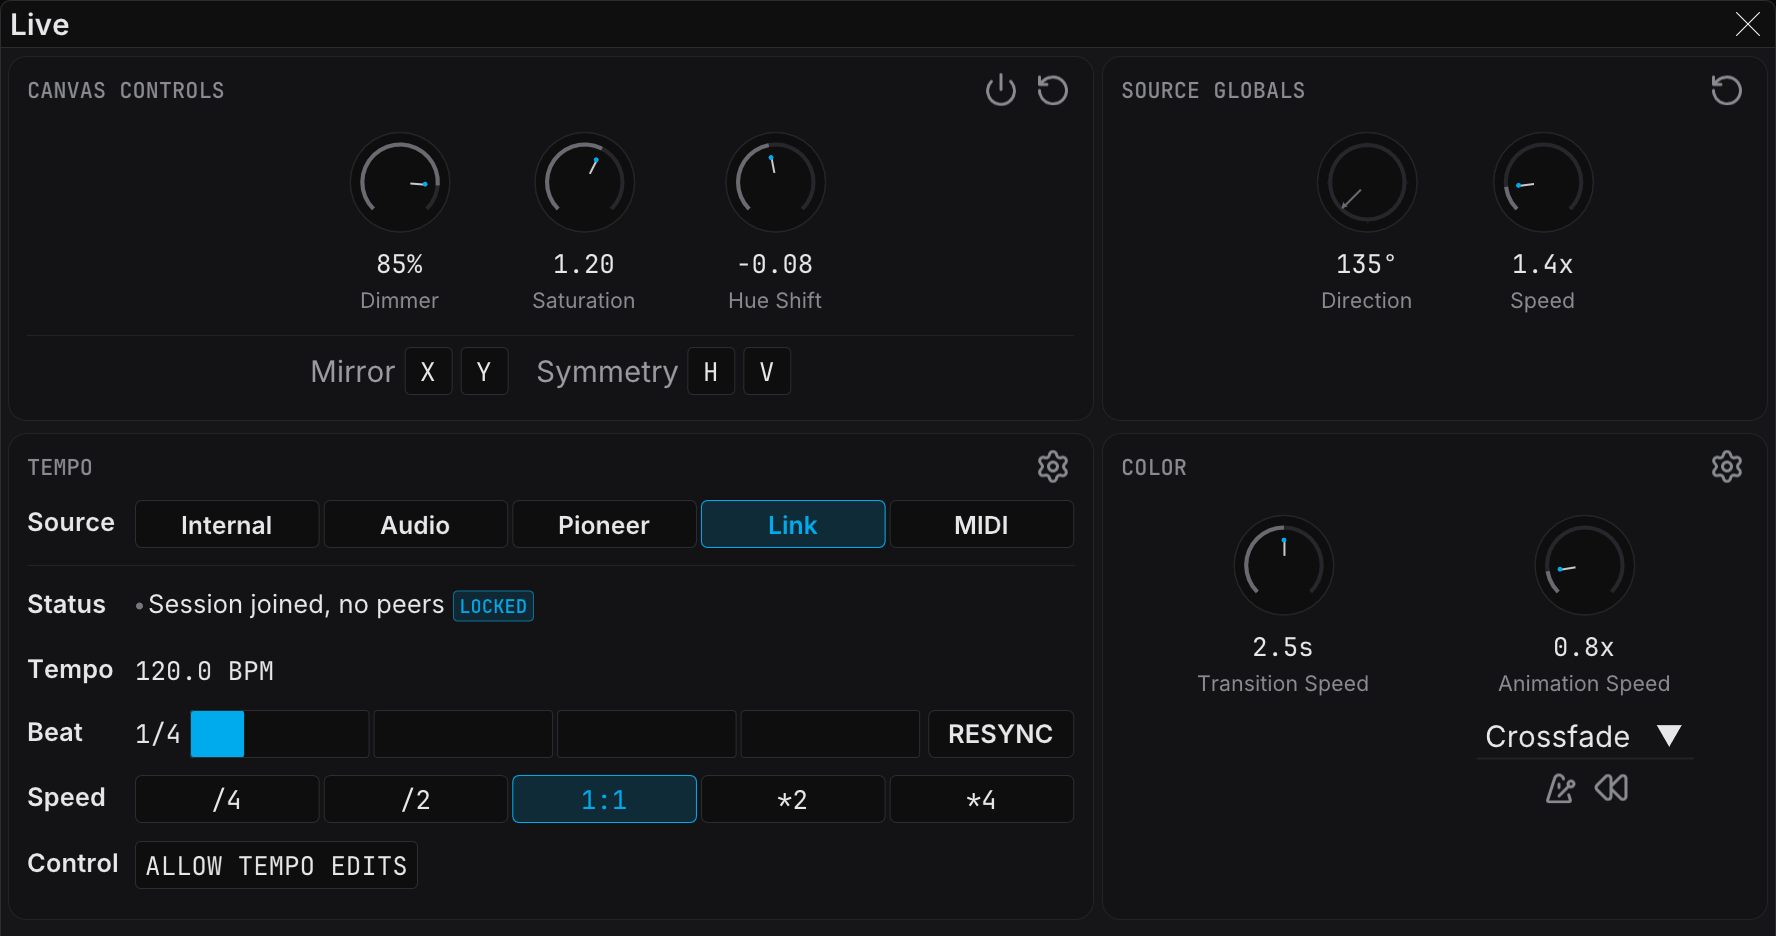
When Ableton Link is the source, FXCanvas hides TAP, the BPM slider, and the Quick row. Only the tempo read-out stays. This prevents an accidental tempo change that disturbs the other Link participants.
To enable tempo control:
- Click the ALLOW TEMPO EDITS chip in the Control row
- Read the warning dialog, which explains the result
- Accept the dialog. The tempo controls appear again.
- Remember that your changes affect all connected Link applications
Use Ableton Link when:
- You work with musicians who use Ableton Live
- Several visual applications must stay in sync
- You want automatic, hands-free tempo sync
- A DJ or a musician controls the tempo (receive-only mode)
Pioneer DJ Pro
Pioneer DJ mode connects to CDJs and mixers with the DJ Link protocol. This mode needs the open-beat-control bridge software. FXCanvas starts and stops the bridge for you.
Supported equipment:
- Pioneer CDJ players, for example the CDJ-2000 and the CDJ-3000
- Pioneer DJM mixers
- Pioneer XDJ controllers
- rekordbox
How it works:
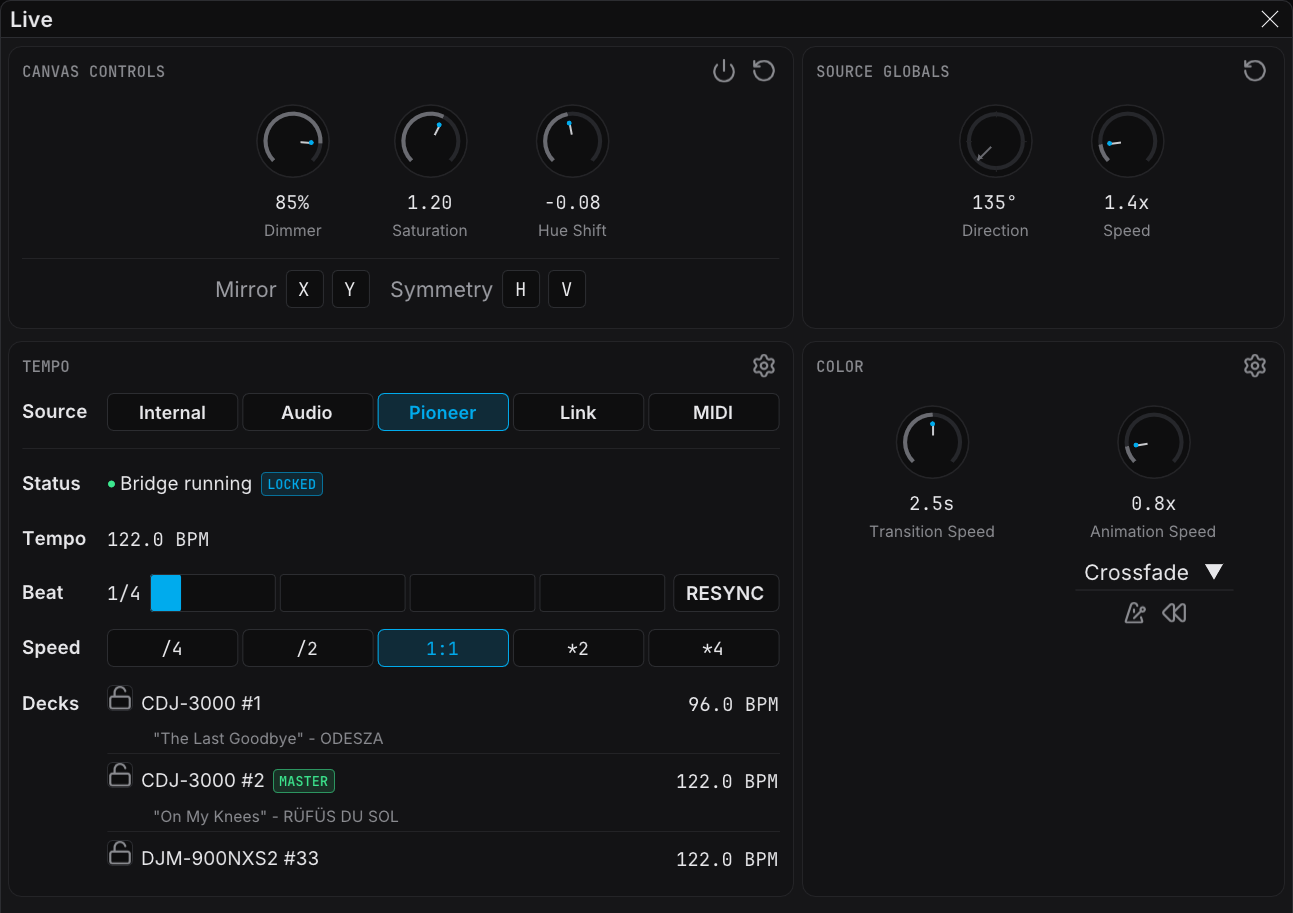
When Pioneer DJ mode is active, FXCanvas connects to your DJ equipment over the network. FXCanvas then takes the beat and tempo data from the current tempo master, which is usually the CDJ that controls the mix.
Use Pioneer DJ mode when:
- You DJ with Pioneer equipment
- You want automatic sync without tap tempo
- Your CDJs are on the same network as your computer
Audio
Audio mode reads the tempo from the incoming audio and locks the beat clock to it. It needs an audio capture device. Select the device in Edit → Settings → Audio Input, or open the gear menu of the Tempo section and select Audio input settings....
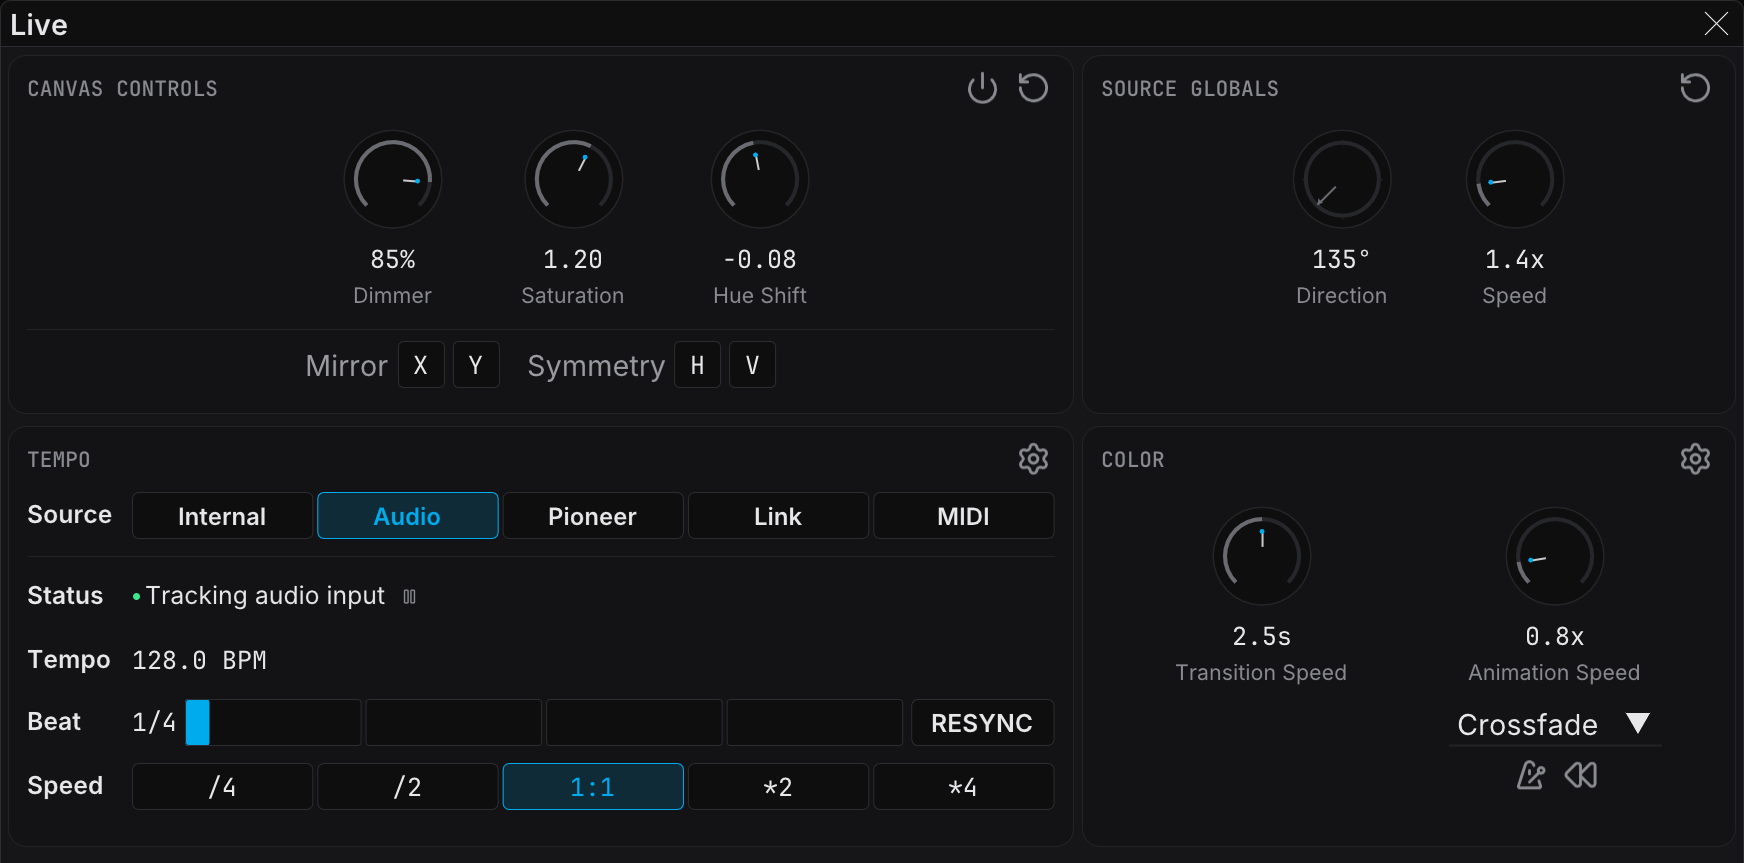
The Status row reports the confidence of the detection. A confident lock also carries the LOCKED badge, and RESYNC then takes the beat position from the audio instead of from your click.
Use Audio mode when:
- You have no network connection to the DJ equipment
- You take a feed from a mixer or from the system audio
- The music has a clear, steady beat
For the device setup, the spectrum preview, and the smoothing controls, see Audio Input.
MIDI Clock
MIDI Clock mode follows the 24 ppqn clock of a DAW, a drum machine, or another MIDI device. Select the port in Edit → Settings → MIDI. See MIDI Clock for the full setup.
Using the Tempo Section
Finding the Controls
The tempo controls are in the Tempo section of the Live panel. If the Live panel is closed, open it again from View → Panels → Live.
Selecting a Tempo Source
Click a chip in the Source row. The active chip carries the accent selected treatment. Each chip holds a tooltip that describes the source.
| Chip | Description |
|---|---|
| Internal | Manual BPM control with TAP tempo |
| Audio | Detect the BPM from the audio input |
| Pioneer | Take the tempo from Pioneer DJ gear through open-beat-control |
| Link | Take the tempo from an Ableton Link session |
| MIDI | Take the tempo from a MIDI clock input |
The gear menu of the section holds Broadcast to Ableton Link and Show Quick Set buttons.
Understanding the Display
- Tempo row — Shows the current tempo in beats per minute. The value updates automatically with an external source.
- Beat row — Shows the beat counter, for example
3/4, beside a four-segment bar that fills across the bar. Use it to make sure that your visuals are in time with the music. - Status row — A colored dot and one sentence that state the condition of the active source. Internal mode needs no status, so the row is absent there.
- LOCKED badge — Appears on the Status row when the beat phase tracks the source.
Using TAP Tempo
With the TAP button you can detect the BPM by hand:
- Click TAP in time with the beat
- After several taps, FXCanvas calculates the average BPM
- Watch the color of the button for the progress:
- Default color — no taps
- Orange — taps in progress
- Green — a valid BPM
Tap on the downbeats, which are the strong beats. This gives the most accurate detection. A reliable reading needs 3 to 4 taps.
Using the RESYNC Button
Click RESYNC on a downbeat to declare "beat 1 is now". The Beat counter snaps to 1/4, and every beat-locked animation restarts from the top. Source envelopes and per-parameter BPM modulation both start a new cycle at that instant. RESYNC is useful in these situations:
- Your visuals drifted out of sync
- You want to align the beat grid with a specific moment in the music
- You start a new track or a new section
Some tempo sources carry their own reliable beat grid: Ableton Link, Pioneer DJ, MIDI Clock, and Audio Input with a confident lock. With these sources, RESYNC takes the position in the beat from the source, which is more precise than a finger on a button. RESYNC takes the bar position from your click. With every other source, RESYNC takes both positions from your click.
Speed Buttons
The Speed row sets the speed of your effects against the actual BPM:
| Button | Effect | Example at 120 BPM |
|---|---|---|
| /4 | Quarter speed (4 beats become 1) | 30 effective BPM |
| /2 | Half speed (2 beats become 1) | 60 effective BPM |
| 1:1 | Normal speed (default) | 120 effective BPM |
| *2 | Double speed (1 beat becomes 2) | 240 effective BPM |
| *4 | Quadruple speed (1 beat becomes 4) | 480 effective BPM |
Quick Set BPM
With the Quick Set buttons you can jump to a common BPM value with one click. The default values are 60, 90, 120, and 140 BPM.
Enable or disable the row with Show Quick Set buttons in the gear menu of the Tempo section. Set the values in Settings. See the Settings section below.
Pioneer DJ Setup Pro
Requirements
Pioneer DJ sync needs these three items:
- Java 11 or later — runs the open-beat-control bridge
- Pioneer equipment — CDJs, mixers, or XDJ controllers
- Network connection — your computer and the DJ equipment on the same network
Checking Java Installation
FXCanvas finds Java automatically in these places:
- A bundled Java runtime, when one is included
- The JAVA_HOME environment variable
- Your system PATH
If FXCanvas does not find Java, it shows an error message. The message asks you to install Java 11 or later.
Enabling Pioneer DJ Mode
- Click the Pioneer chip in the Source row
- FXCanvas starts the open-beat-control bridge automatically
- Wait a few seconds while the bridge connects to your network
Understanding the Device List
After the connection, the Decks row lists the devices that FXCanvas finds. Before any device answers, the row reads Waiting for CDJ/XDJ devices....
Each deck row shows:
| Element | Description |
|---|---|
| Lock icon — Click the open lock to lock a deck as the tempo source. Click the closed lock to return to auto-follow master mode | |
Device name — The model of the device (CDJ-2000nxs2, DJM-900NXS2, and others), followed by the player number as #N (1-4 for CDJs, 33 for mixers) | |
| MASTER — A badge that appears when the device is the DJ Link tempo master | |
| BPM — The current tempo of the device, on the right of the row | |
| Track — The title and the artist of the loaded track, under the device name |
The tempo master is usually the CDJ that plays and controls the mix.
Troubleshooting Pioneer DJ
No devices found:
- Make sure that your computer is on the same network as the DJ equipment
- Make sure that Pro DJ Link is enabled on your CDJs
- Make sure that no firewall blocks the UDP traffic
- Start Pioneer DJ mode again
Java not found:
- Install Java 11 or later from adoptium.net
- Set the JAVA_HOME environment variable
- Restart FXCanvas after you install Java
Bridge not starting:
- Make sure that no other application uses OSC port 17002 or 17003
- Make sure that open-beat-control.jar is in the lib/runtime folder
- Read the application logs for error messages
Ableton Link Setup Pro
Enabling Link
- Click the Link chip in the Source row
- FXCanvas joins the Link session on your network automatically
- The Tempo row shows the current tempo of the Link session
- FXCanvas hides the tempo controls for safety, by default
Connecting with Other Apps
Every Link application on the same network finds the other participants automatically. Make sure that these conditions are true:
- All devices are on the same local network (WiFi or Ethernet)
- Link is enabled in each application
- No firewall blocks the Link traffic (UDP multicast)
Understanding Peer Count
After the connection, the Status row reports the session state in words, for example Session joined, 2 peers.
- 0 peers — FXCanvas is alone in the Link session
- 1+ peers — other applications are connected and in sync
The peer count holds the other applications only. It does not count FXCanvas.
Enabling Bidirectional Mode
When Ableton Link is your tempo source, FXCanvas disables the tempo controls by default. This prevents an accidental tempo change for everybody else in the Link session.
To enable tempo control with Ableton Link, do these steps:
- Find the ALLOW TEMPO EDITS chip in the Control row
- Click the chip. A warning dialog appears.
- Read the warning. If you accept the result, click Enable
- Use the tempo controls (TAP, BPM slider, Quick Set), which are back on the panel
When to enable bidirectional mode:
- You work with other VJs, and all of you share the tempo control
- You must adjust the tempo during a visual performance
- Everybody in the Link session agrees to shared tempo control
When to keep it disabled (recommended):
- You sync with a DJ or a live musician
- Ableton Live or other production software runs in the session
- You want a "set it and forget it" sync
The Warning Dialog
FXCanvas shows a warning the first time that you enable Broadcast to Ableton Link or Allow tempo changes:
Enable Link Tempo Control?
This will allow FXCanvas to control the tempo of all devices connected to this Ableton Link session.
Only enable this option when your Link session consists of visual and lighting applications. Do not enable if music production software (like Ableton Live) is connected, as this could disrupt your performance.
If you know Link and you accept the result, tick Don't show this warning again, then click Enable. FXCanvas saves this setting. No control in Settings restores the warning.
Broadcast to Ableton Link
With the Broadcast to Ableton Link setting, FXCanvas sends its own tempo to a Link session. The setting is in the gear menu of the Tempo section, and a checkmark marks it when it is active. This setting is useful in these situations:
- Pioneer DJ is your source, and you want to share the tempo with Link applications
- Internal mode is your source, and you want to be the tempo master for other applications
Enabling Broadcast
A warning dialog appears the first time that you enable this setting:
- The dialog explains that broadcast gives FXCanvas control of the tempo for all connected Link applications
- Enable broadcast only when your Link session holds visual and lighting applications
- Do not enable broadcast when Ableton Live or other music production software is connected
When Broadcast is Active
- The Status row states the session state and the peer count
- A green dot means that peers are connected
- A yellow dot means that FXCanvas found no peers yet
Settings
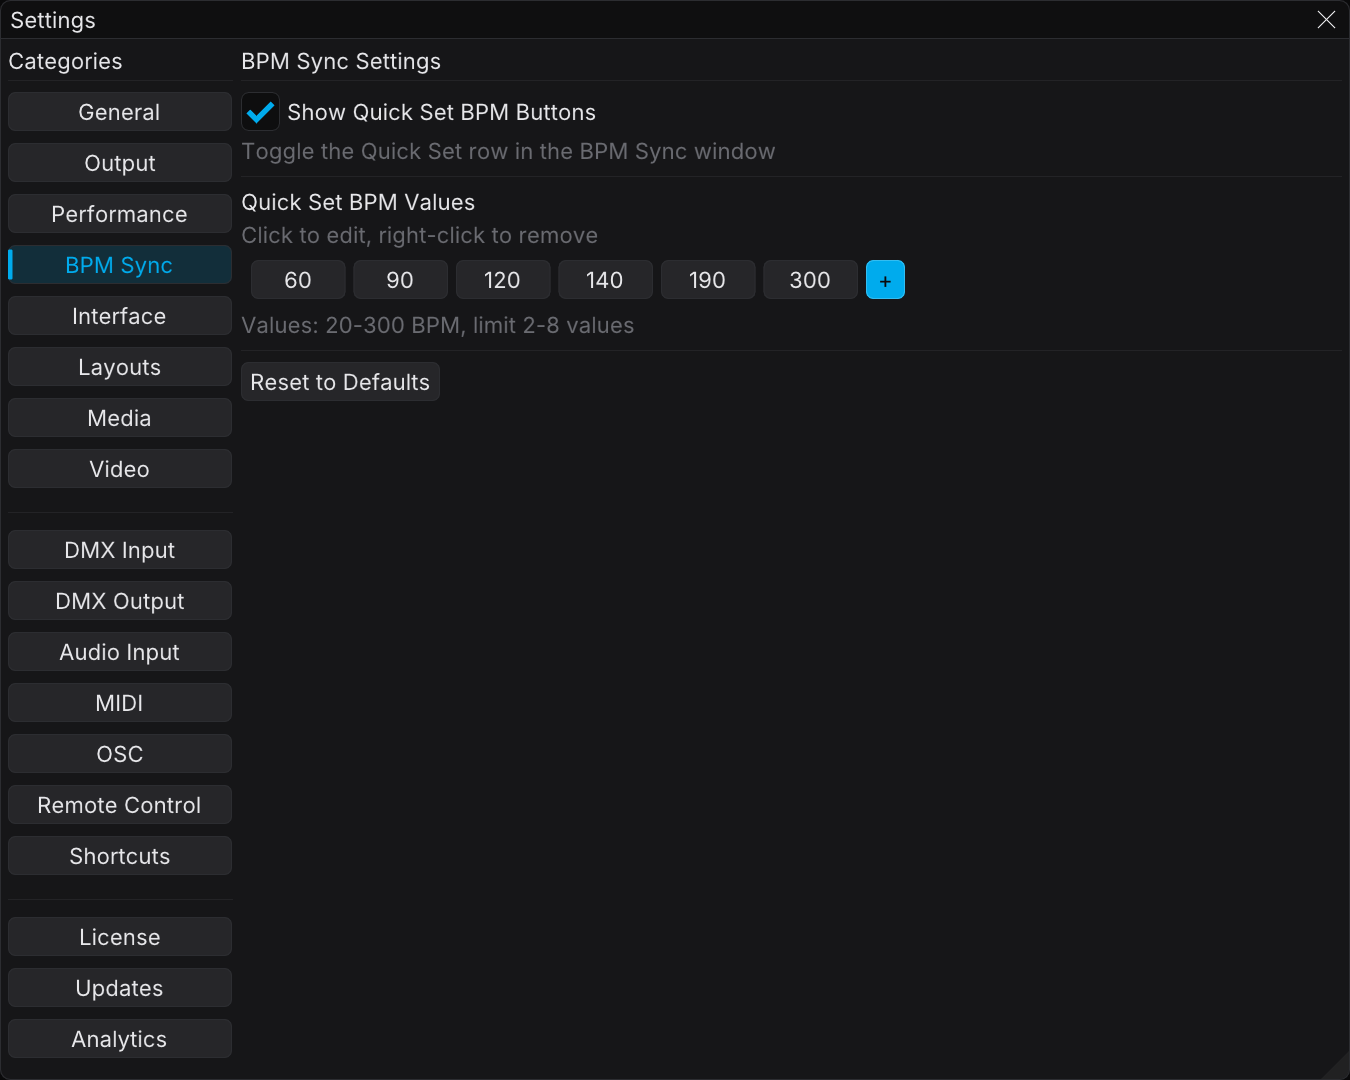
The BPM Sync settings are in the Settings window, on the BPM Sync tab.
Available Settings
| Setting | Description |
|---|---|
| Show Quick Set BPM Buttons | Enables or disables the Quick Set row in the Tempo section (the gear menu of the section holds the same setting) |
| Quick Set BPM Values | Sets which BPM values appear as quick buttons (click to edit, right-click to remove, click + to add) |
| Reset to Defaults | Restores the Quick Set values to 60, 90, 120, and 140 |
Each Quick Set value must be between 20 and 300 BPM. The row holds between 2 and 8 buttons.
Tips and Best Practices
For Live Performance
- Test your sync before the show — make sure that Pioneer DJ or Link works during soundcheck
- Keep a backup plan — if the sync fails, switch to Internal mode and tap the tempo
- Use RESYNC strategically — click RESYNC at the start of a track and during transitions to hold a tight sync
Choosing the Right Tempo Source
| Tempo Source | Best For |
|---|---|
| Pioneer DJ | Clubs with professional DJ equipment |
| Ableton Link | Studio work and setups with several applications |
| Internal | Standalone use, and situations without another sync option |
Speed Tips
- Use /2 for slower, more dramatic effects on fast music
- Use *2 for energetic, quick animations on slow music
- The 1:1 setting works well in most situations
Network Considerations
- Pioneer DJ Link and Ableton Link both need network access
- For reliability, use wired Ethernet and not WiFi
- Make sure that your firewall passes the necessary UDP traffic
Safety Tips for Using Link with Live Musicians
Live musicians need extra care, because a wrong tempo change disturbs their performance. Obey these guidelines.
Before the Performance
- Communicate with the musicians — tell them that you connect over Ableton Link
- Agree on who controls the tempo — in most cases the musician is the tempo master
- Test during soundcheck — make sure that Link works and that your visuals stay in sync
- Default to receive-only mode — keep ALLOW TEMPO EDITS off until you need it
During the Performance
- Do not touch the tempo controls — do not change the BPM during a live set, even in bidirectional mode
- Monitor but do not interfere — watch the Beat row to make sure that the sync holds
- Know your fallback — if Link fails, switch to Internal and tap the tempo
Common Mistakes to Avoid
| Mistake | Why It Is Dangerous | Prevention |
|---|---|---|
| Enabling ALLOW TEMPO EDITS at a live gig | You can change the tempo of the musician by accident | Keep it off and use receive-only mode |
| Leaving "Broadcast to Ableton Link" enabled | Your internal tempo changes affect the whole session | Enable it only when you lead on purpose |
| No test before the show | A Link error is stressful to debug during a performance | Always test during soundcheck |
| Using WiFi instead of Ethernet | Network instability causes sync drift | Use wired connections |
When Bidirectional Mode Is Safe
Bidirectional mode is safe in the situations below. This applies to Broadcast to Ableton Link and to ALLOW TEMPO EDITS.
- You perform alone, or with other VJs only
- Everybody agrees to shared tempo control in advance
- You are in a rehearsal or a jam session, and not in a live show
- You work with applications that expect tempo changes, for example lighting software
Troubleshooting Ableton Link
No Peers Detected
Symptoms: The peer count shows 0, and other Link applications run.
Solutions:
- Make sure that all devices are on the same WiFi network, or connected with Ethernet
- Make sure that Link is enabled in the other applications
- Disable Windows Firewall for a short test, to see whether it blocks the multicast traffic
- If you use several network adapters, make sure that they are on the same subnet
- Restart FXCanvas and the other Link applications
Tempo Not Syncing
Symptoms: The peer count shows connections, but the BPM does not match the other applications.
Solutions:
- Click RESYNC to reset the beat phase
- Make sure that no other application changed the tempo recently. A change needs a moment to propagate.
- If you use Internal mode, make sure that you did not enable "Broadcast to Ableton Link" by accident
Tempo Controls Do Not Appear
Symptoms: The ALLOW TEMPO EDITS chip does not bring the controls back.
Solutions:
- Make sure that Link is your tempo source, and not Internal or Pioneer
- Click the chip. The controls return only after the chip is on.
- If the whole Link block is grayed out, your license does not cover Ableton Link
Beat Phase Drift
Symptoms: The visuals drift out of sync with the music over time.
Solutions:
- Click RESYNC to align the beat phase again
- Make sure that the tempo source is stable and does not fluctuate
- If you use WiFi, change to Ethernet for more stable timing
- Make sure that no other Link peer fights for the tempo control
Link Conflicts with Other Software
Symptoms: Link causes errors in other running applications.
Solutions:
- Some DAWs need Link enabled in their preferences
- Make sure that no other application tries to be the Link tempo master
- Close the Link applications that you do not need, to make the session simpler
- On Windows, make sure that no VPN software disturbs the multicast traffic
Still Having Issues?
If Ableton Link still fails, do these steps:
- Make sure that your firewall passes UDP multicast, which Link uses
- Connect with Ethernet instead of WiFi
- Make sure that all devices are on the same network subnet
- Read the Ableton Link documentation for more troubleshooting
Related Topics
- Getting Started — The basics of FXCanvas
- Sources — Visual sources with tempo-synced parameters
- Video Playback — Play video clips and images as sources
- Audio Input — Audio BPM detection as a tempo source
- MIDI Clock — Tempo source from MIDI devices